
EazyBot/FinBot
Overview
EazyBot and FinBot are enterprise-grade AI assistant products provided by the EazyDevelop platform. Users can interact with agents to complete Q&A, analysis, content generation, data queries, tool invocation, and automated tasks.
- EazyBot targets general enterprise office scenarios, suitable for customer service, operations, sales, R&D, data analysis, knowledge Q&A, and other businesses.
- FinBot targets financial and investment research scenarios, suitable for research report interpretation, financial statement analysis, industry comparison, valuation assistance, financial data queries, and investment research workflow automation.
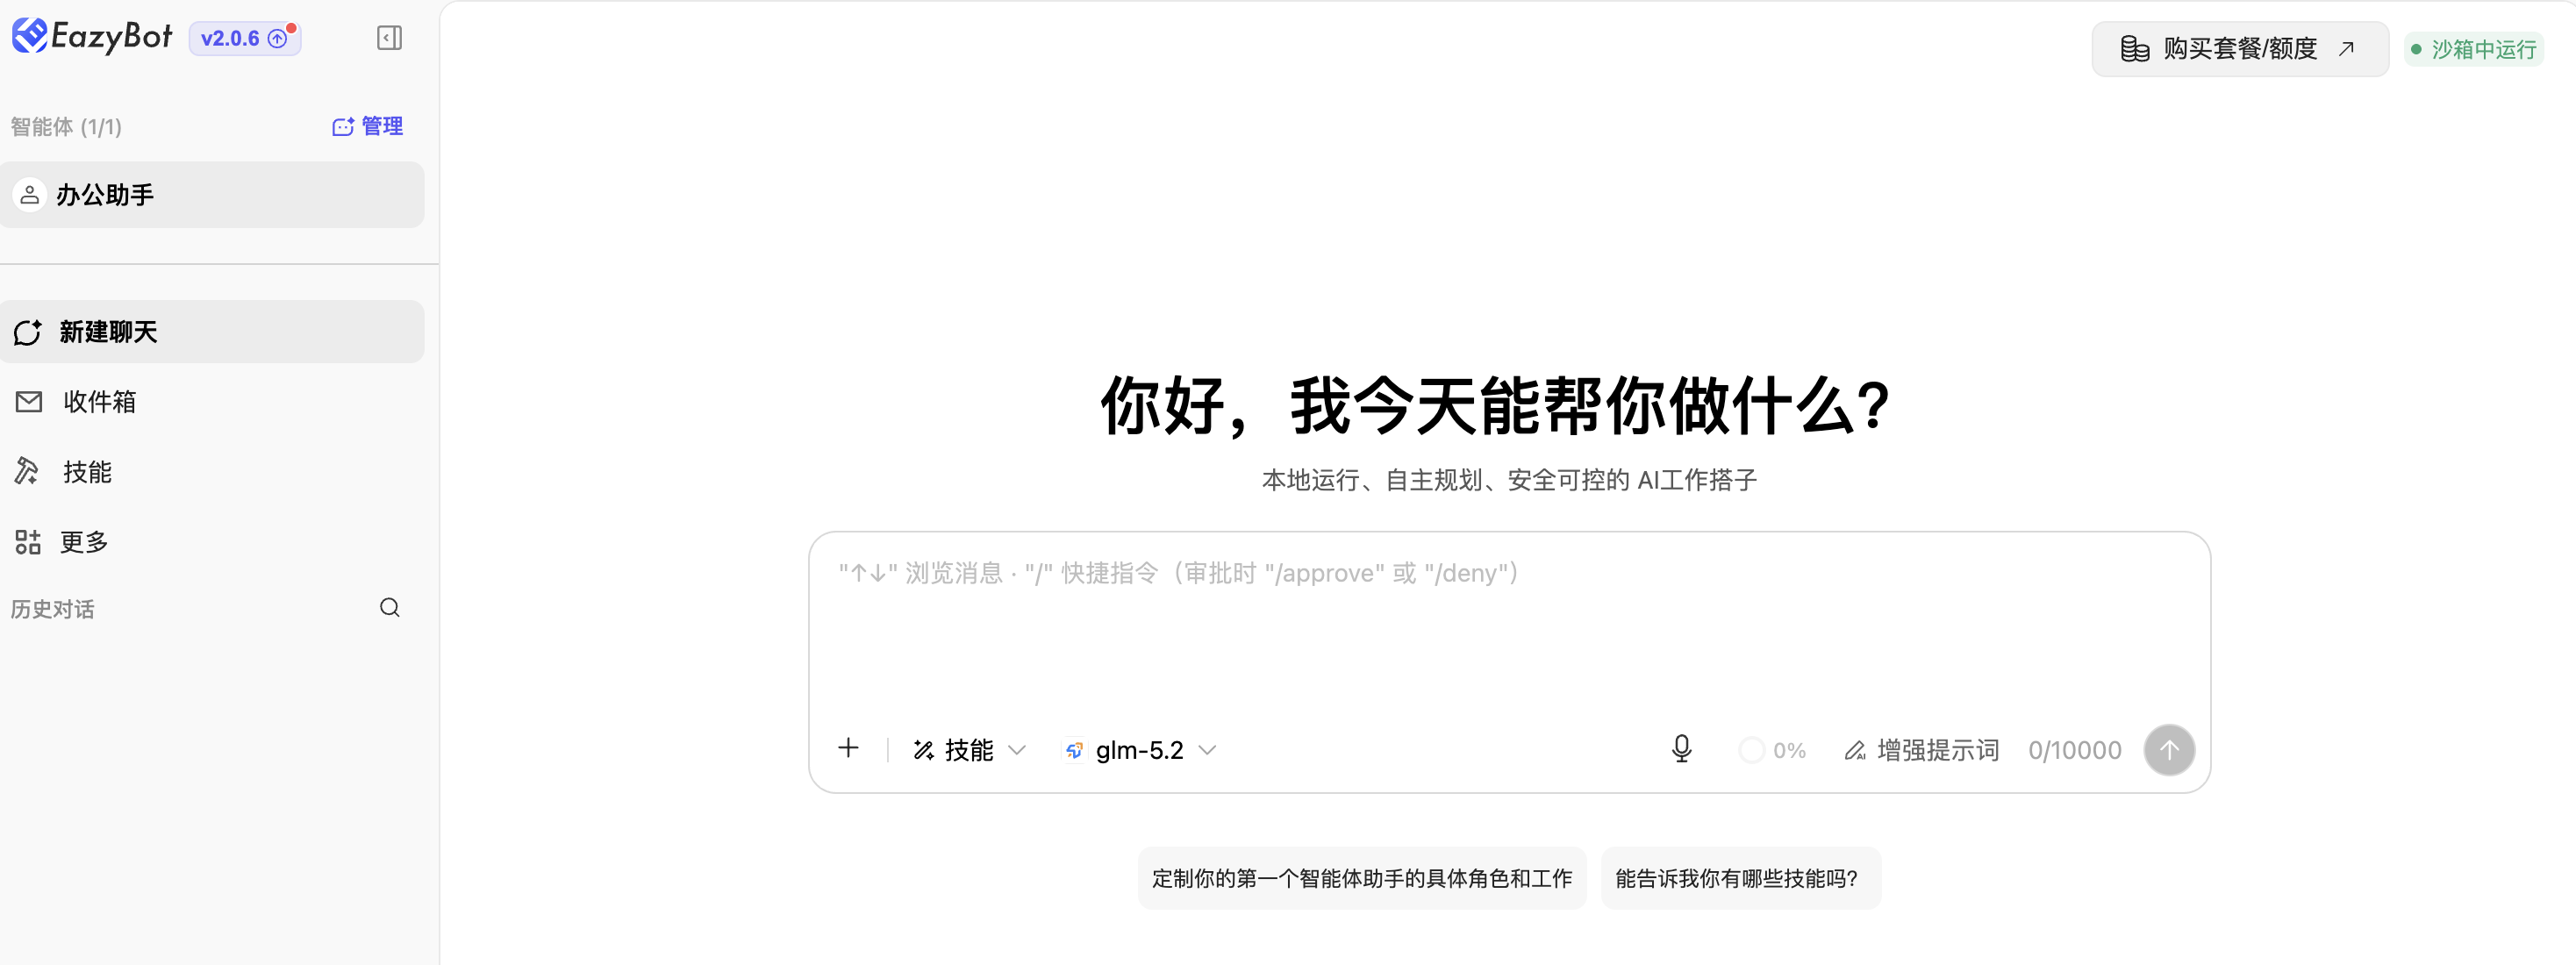
The main interface is divided into three parts:
- Left navigation bar: Switch between agents, chat, inbox, skills, channels, MCP, scheduled tasks, and other functions.
- Center workspace: Displays the specific content of the current function page.
- Bottom user area: Shows the current logged-in account and provides settings, appearance, language, account management, and other entries.
Agent Management
The top of the left sidebar is the agent area. Users can view all agents there, including default agents, team-assigned agents, and custom agents.
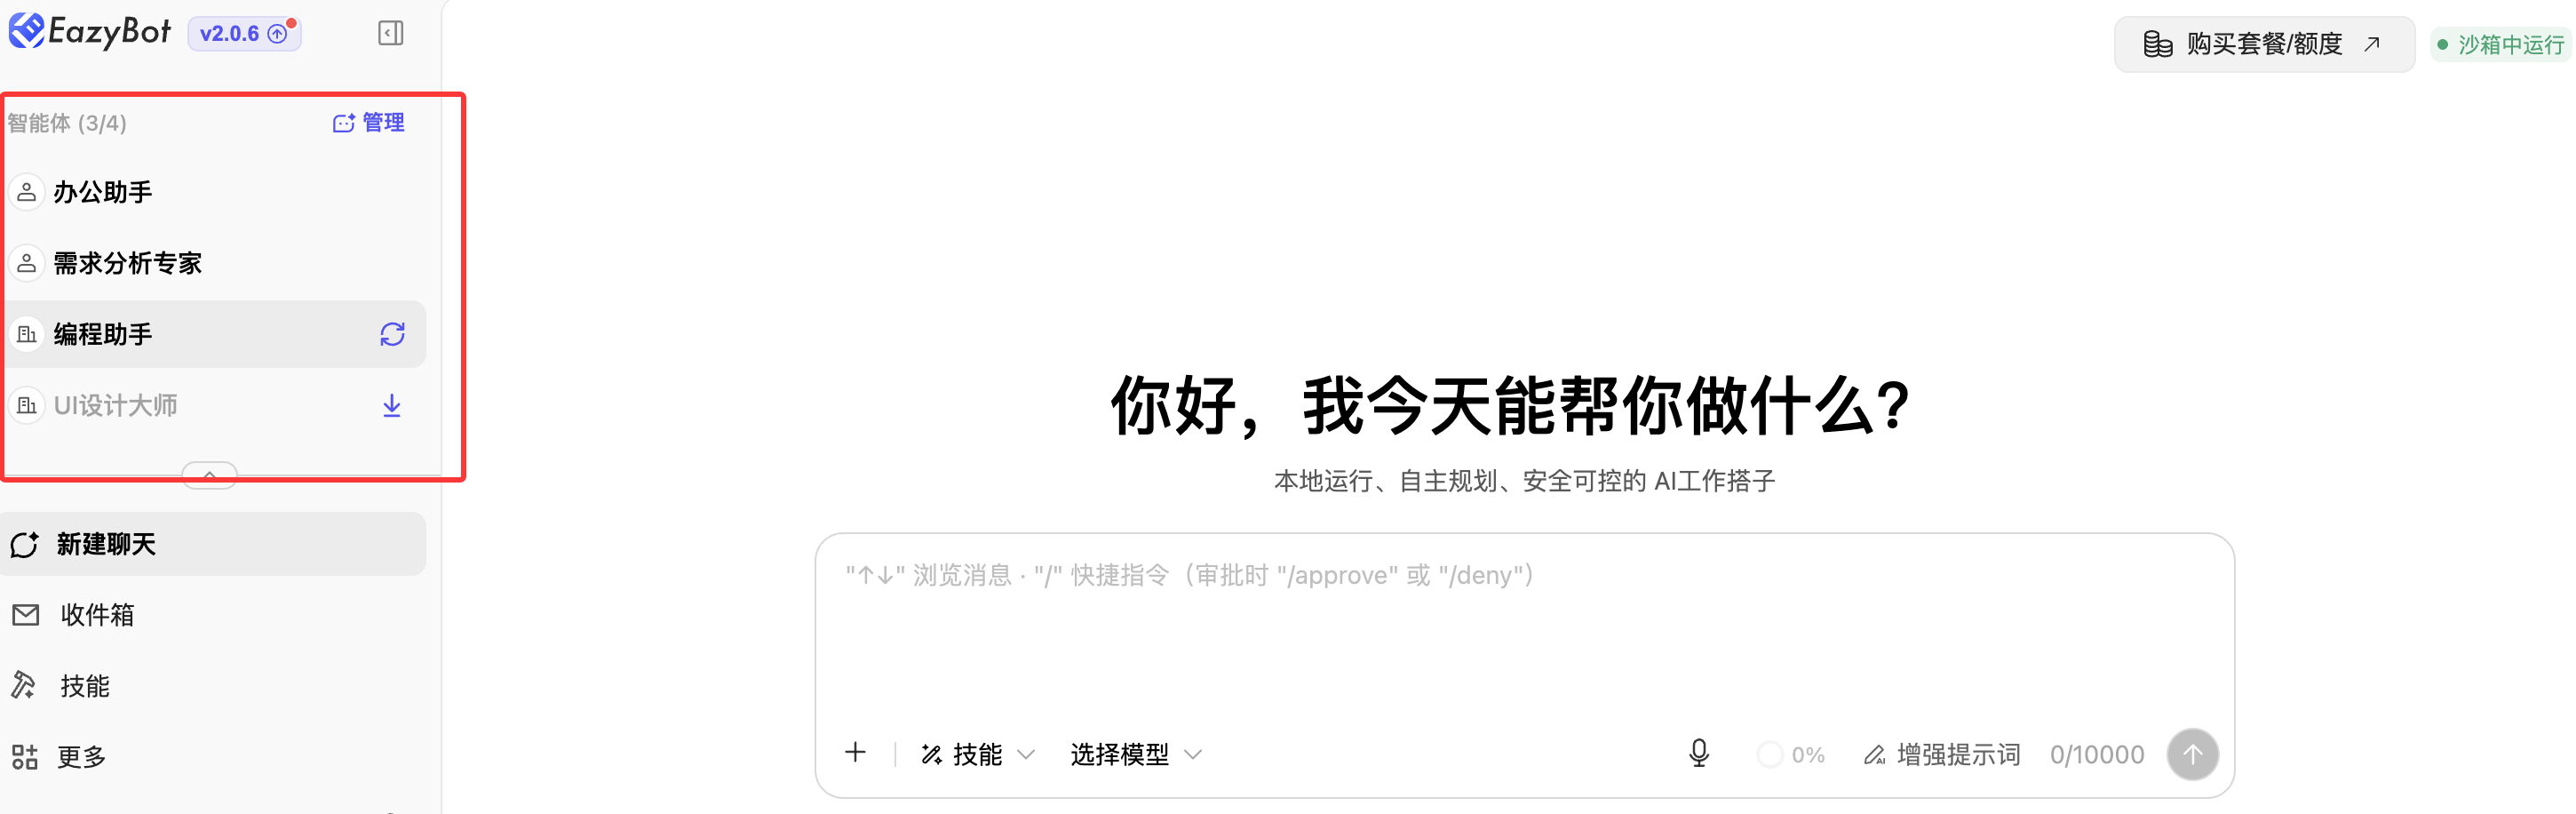
- The system displays the current default agent, typically used for default chat, task processing, or automated execution.
- In the agent list, uninstalled agents show an Install button on the right. Click to install the agent.
- When team agents are updated, an Update button appears on the right. Click to update the agent to the latest version.
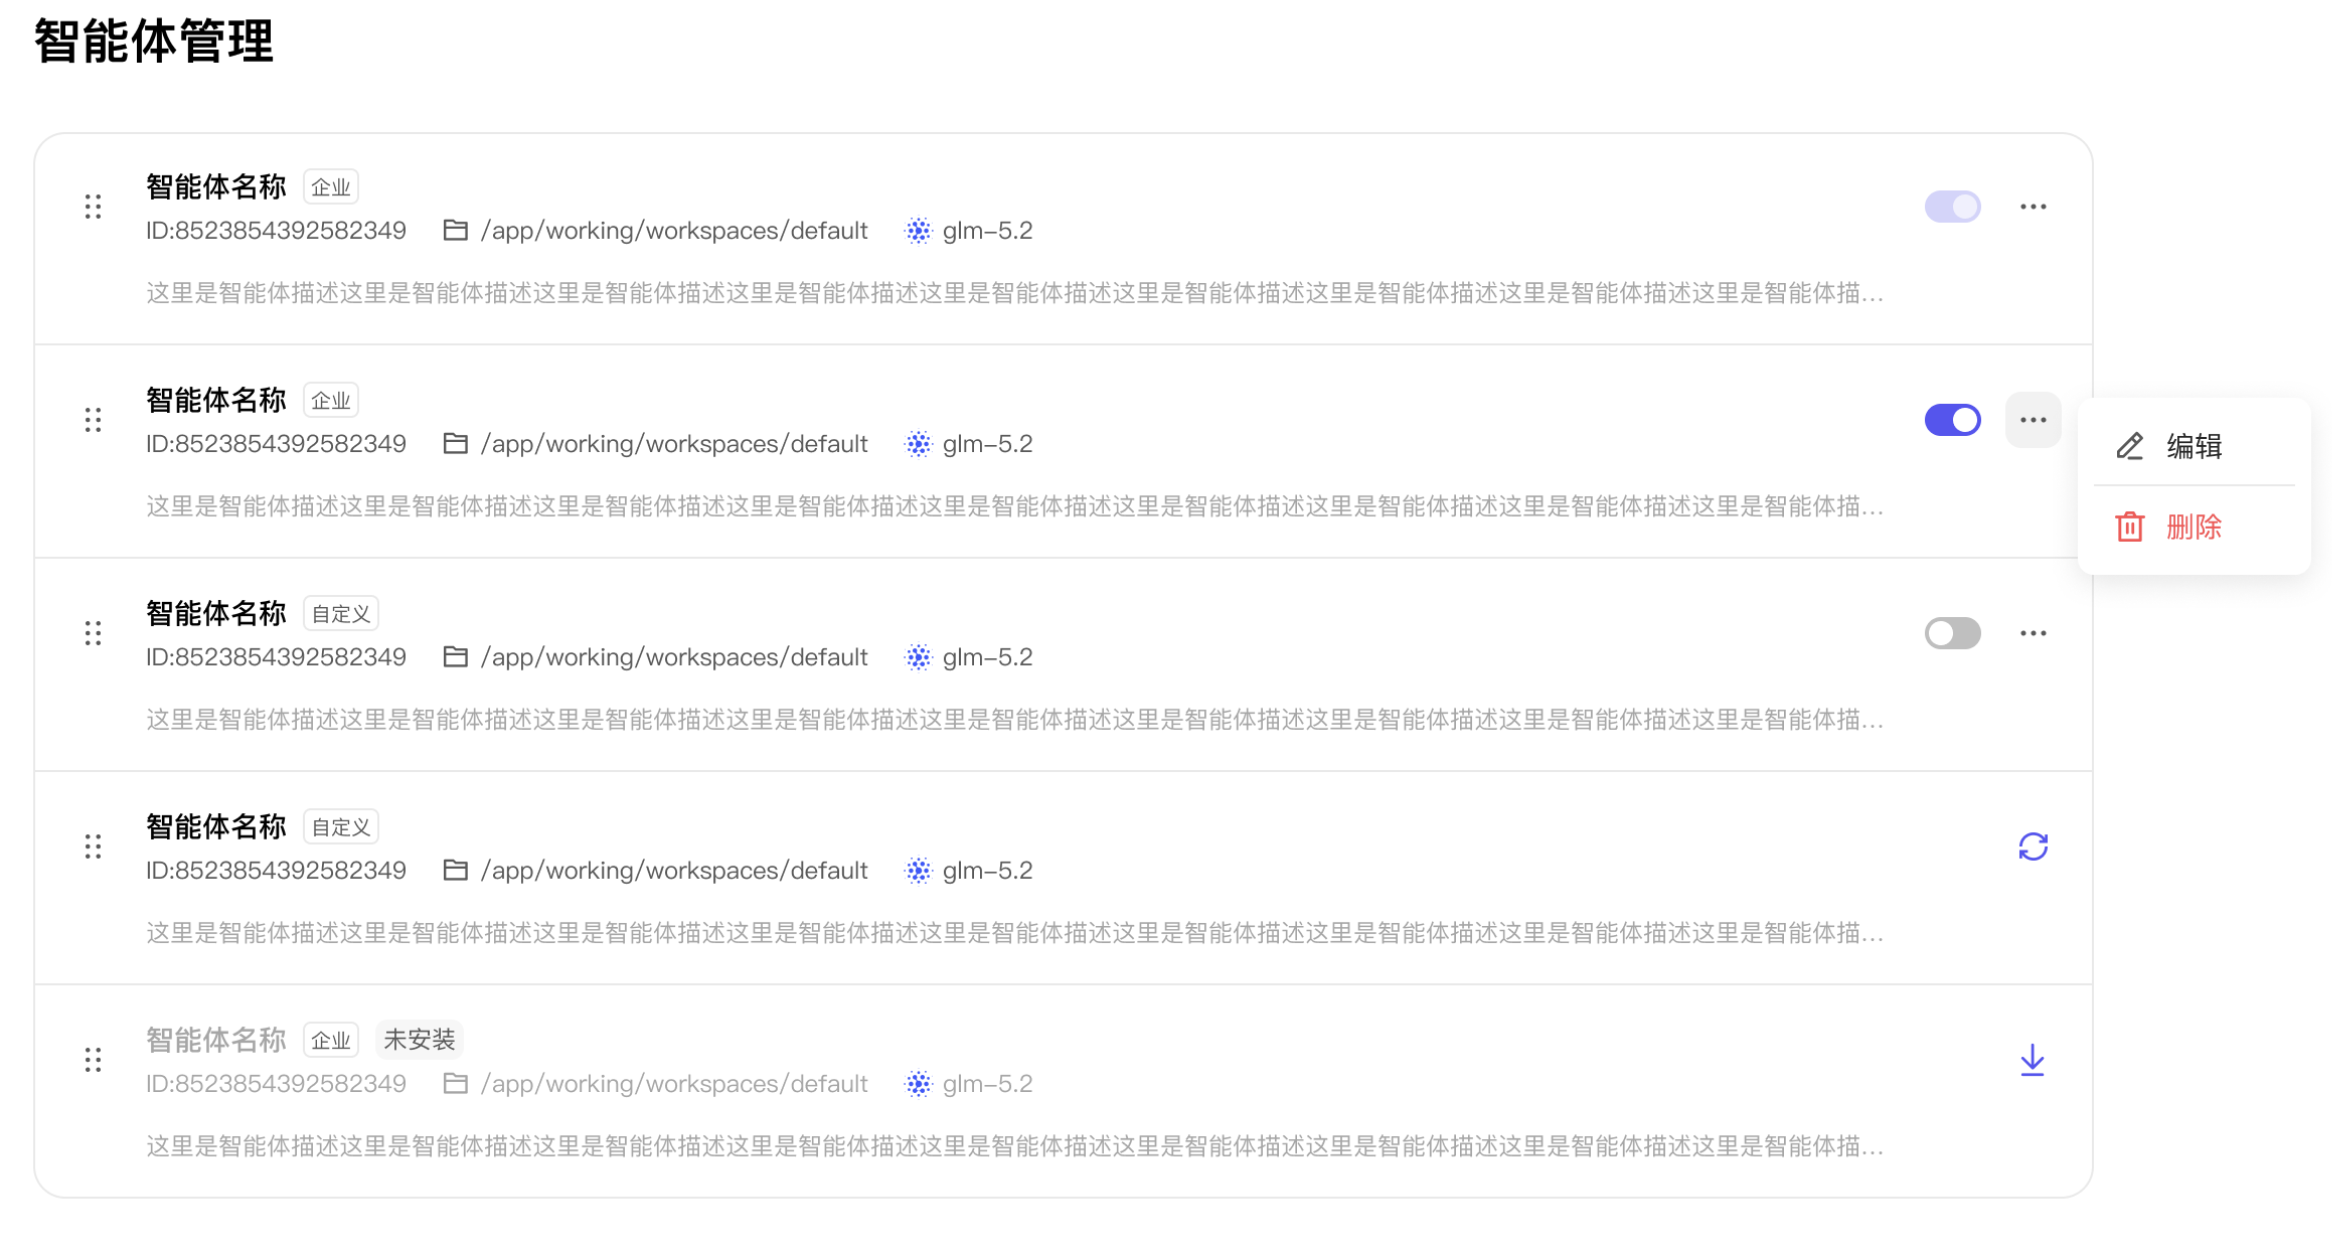
- Click the Manage button to manage agents and adjust order.
Chat
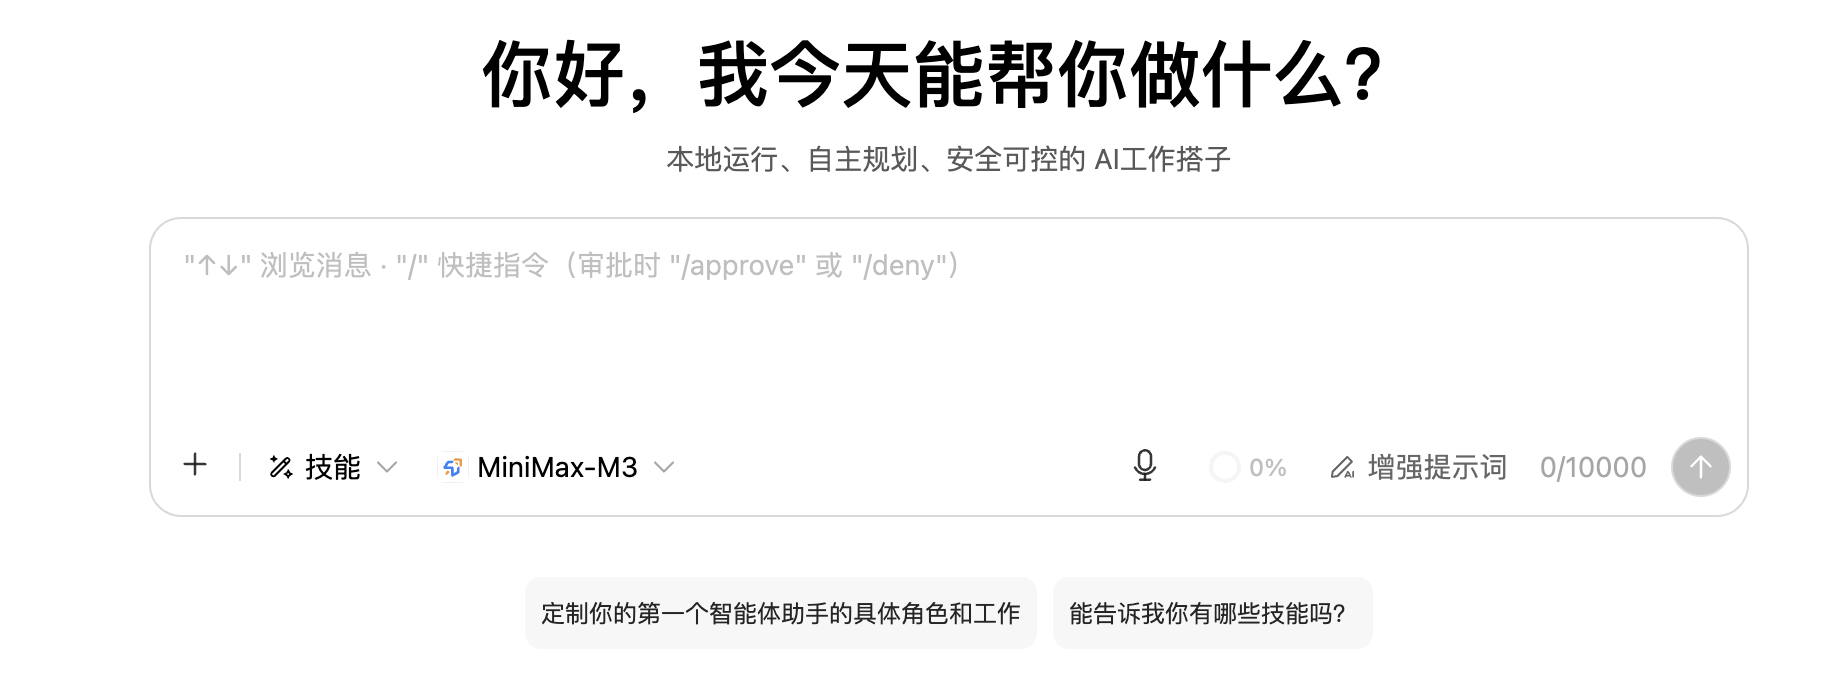
- Describe your question or task in the input box.
- To upload materials, click + to add attachments.
- To use specific capabilities, click skills to select.
- Switch to the appropriate model based on task needs.
- Use enhanced prompts to optimize expression so the Bot understands requirements more accurately.
- Click the send button in the bottom-right corner to submit the task.
Inbox
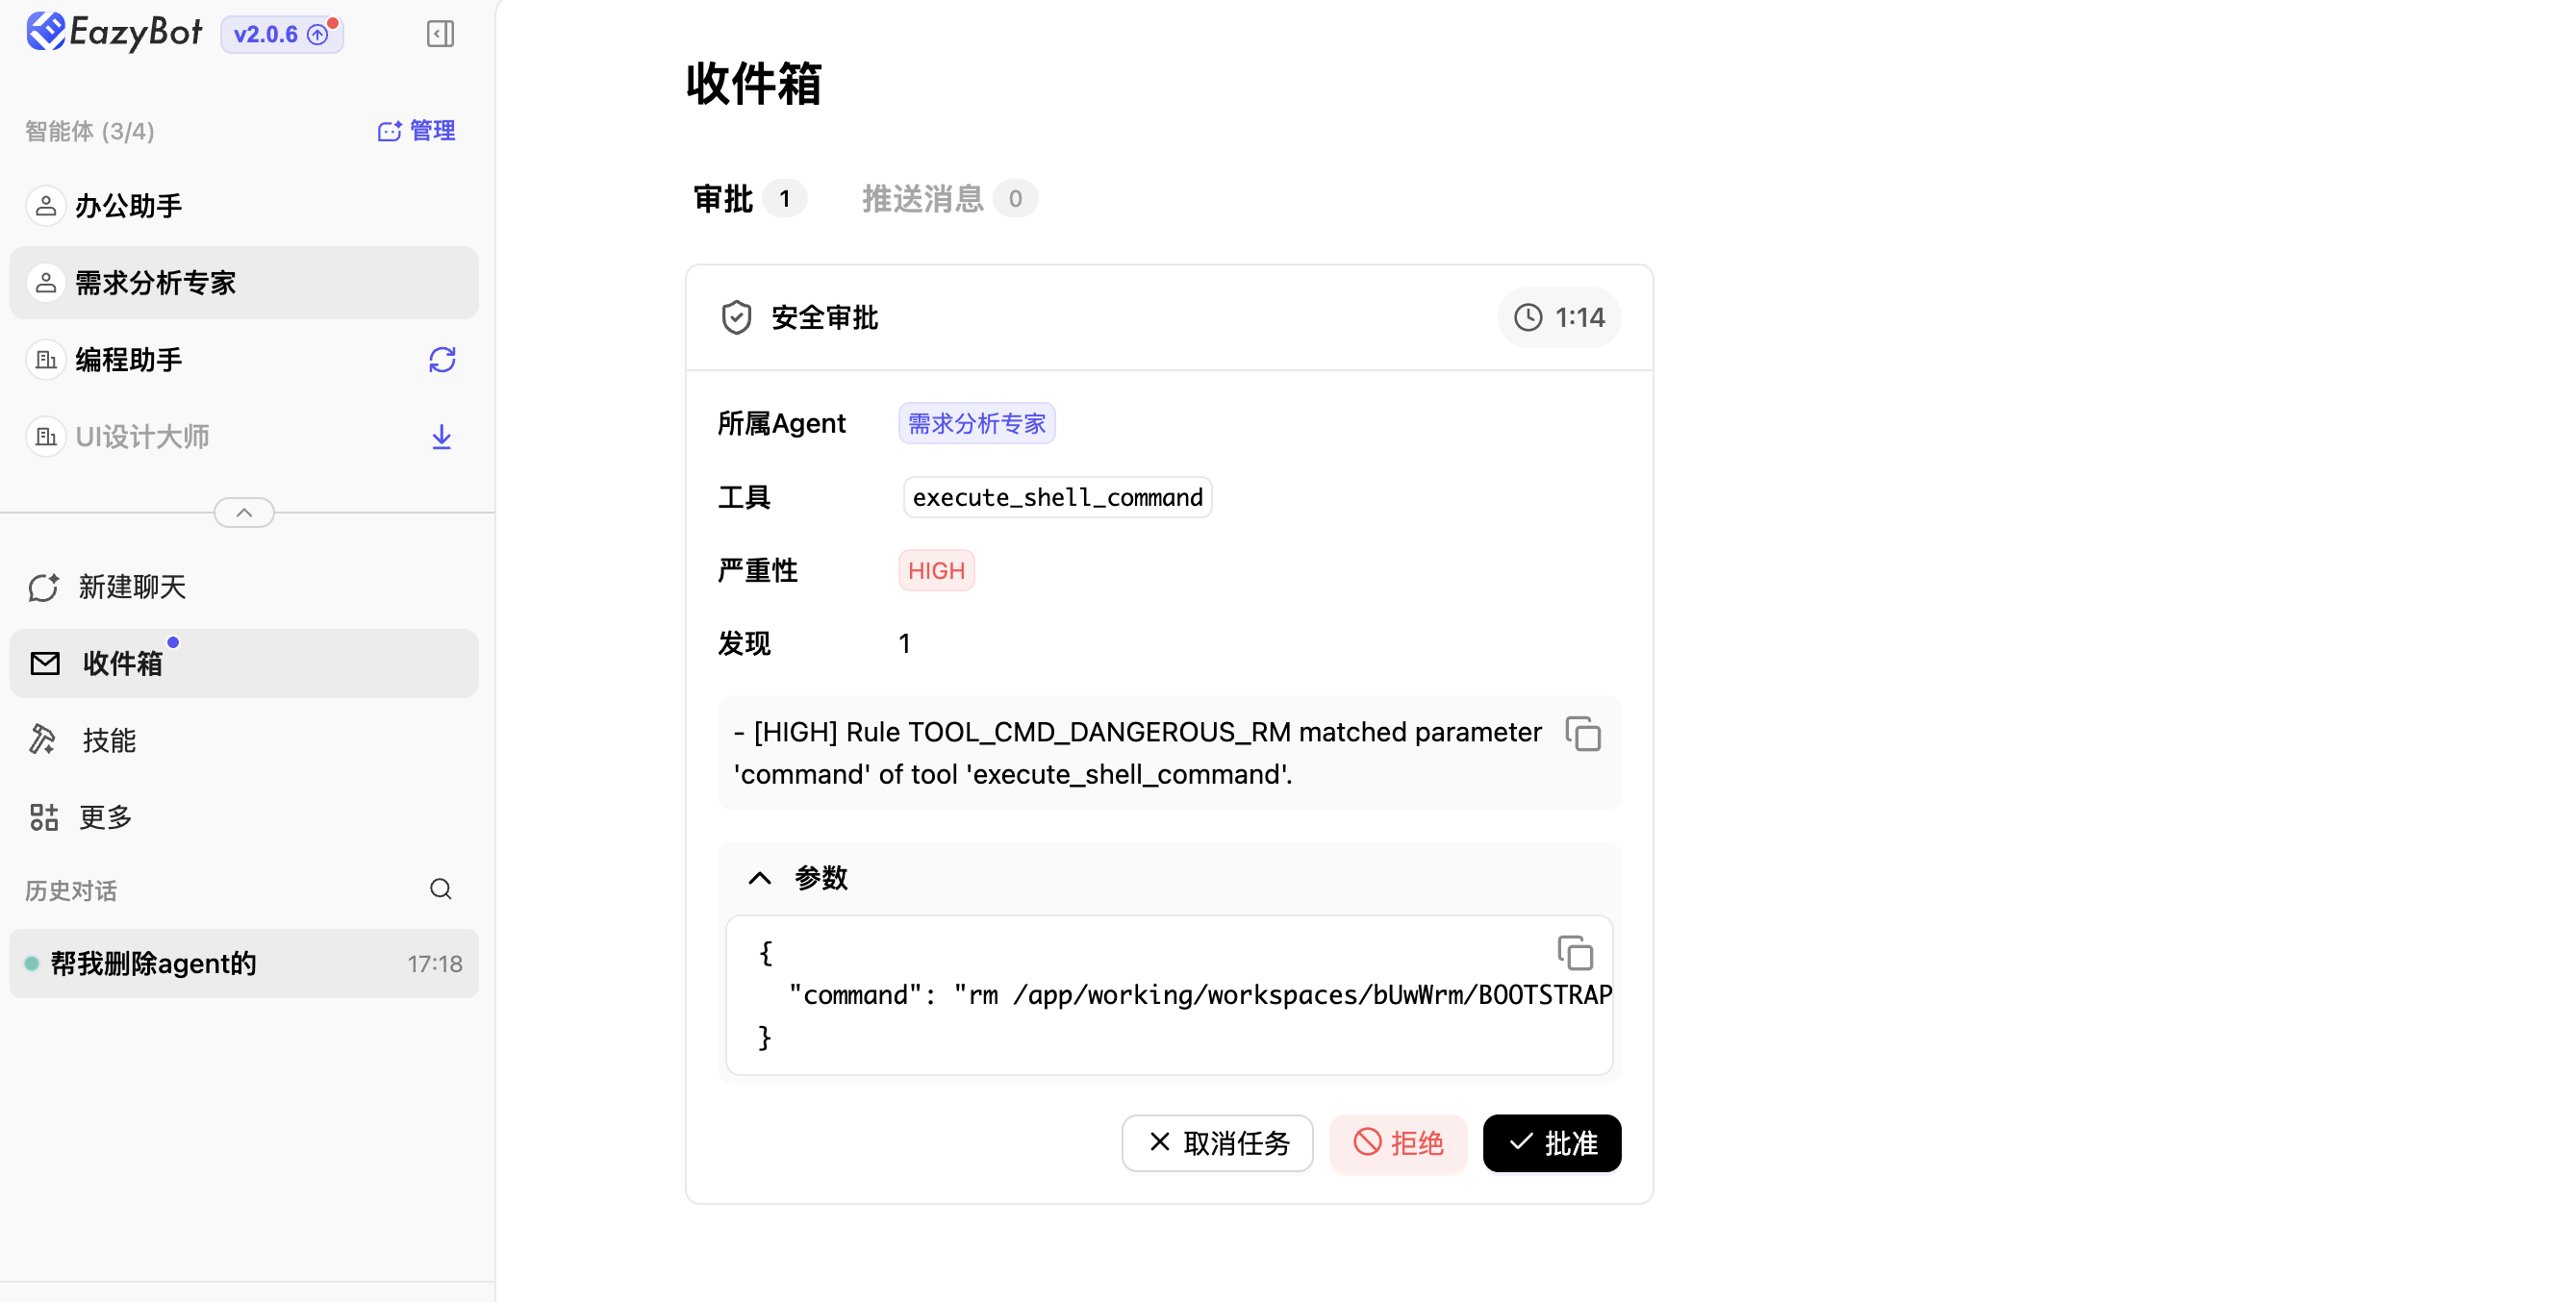
The inbox centrally collects approval notifications and scheduled task information for convenient viewing and processing.
- Unread reminders: Red dot on the entry marks unread messages. Enter to process and prevent missing important notifications.
- Unified approval: All approval requests from the Agent console are summarized on the approval page, supporting batch approve / reject / cancel task. Approvals have a time limit countdown; timeout auto-rejects. Actions sync in real time with chat dialogs.
- Message push: Toggle result push on scheduled tasks and heartbeat pages. Click messages to view complete execution trace details.
Skills
Enterprise Skills
- Enterprise agents default to showing skills bound to the enterprise agent.
- Custom agents default to showing skills shared by the enterprise on ED.
- When enterprise skills are not installed, an install button is shown. Click to install; a success prompt appears and status changes to installed. When the enterprise updates a skill, installed skills show an Update button. Click to update and replace the original skill package.
Installed
- Shows all installed skills, including built-in skills (installed by default), enterprise skills, and custom skills (custom agents only).
- New Update Skills button allows one-click update of all skills needing updates (replaces original skill packages).
MCP
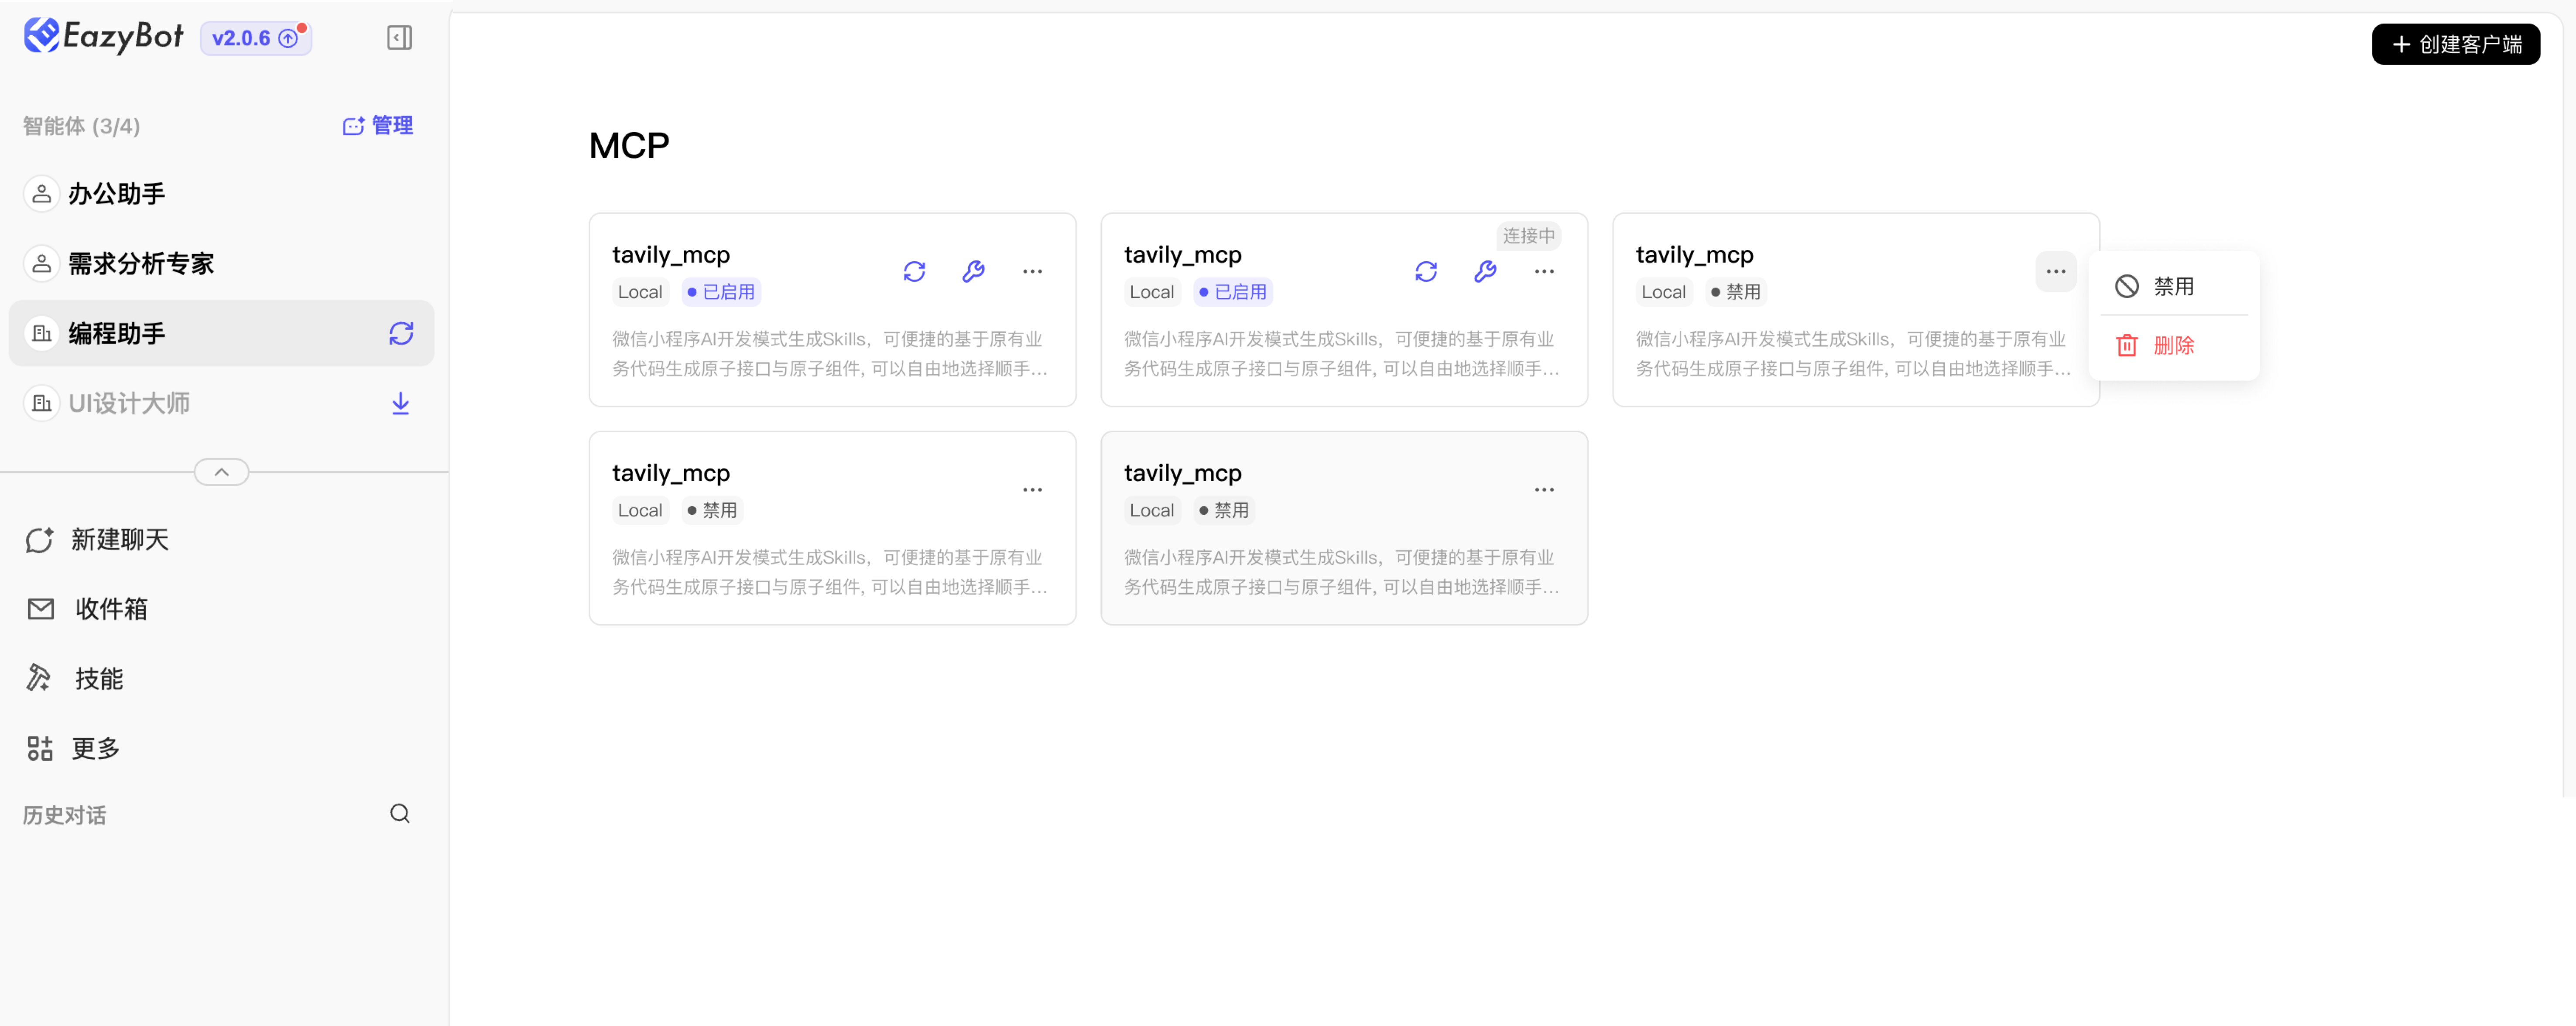
- Enterprise agents with bound MCP show the bound MCP here. Tool list automatically connects to services.
- If bound agent MCP has updates, an update button is shown. Click to deploy the update.
- Enterprise agents have no create client, edit, enable/disable, or delete buttons.
- Custom default agents have create client, edit, enable/disable, and delete buttons.
- Description shows 2 lines by default with ellipsis overflow. Hover to show full description.
Channels
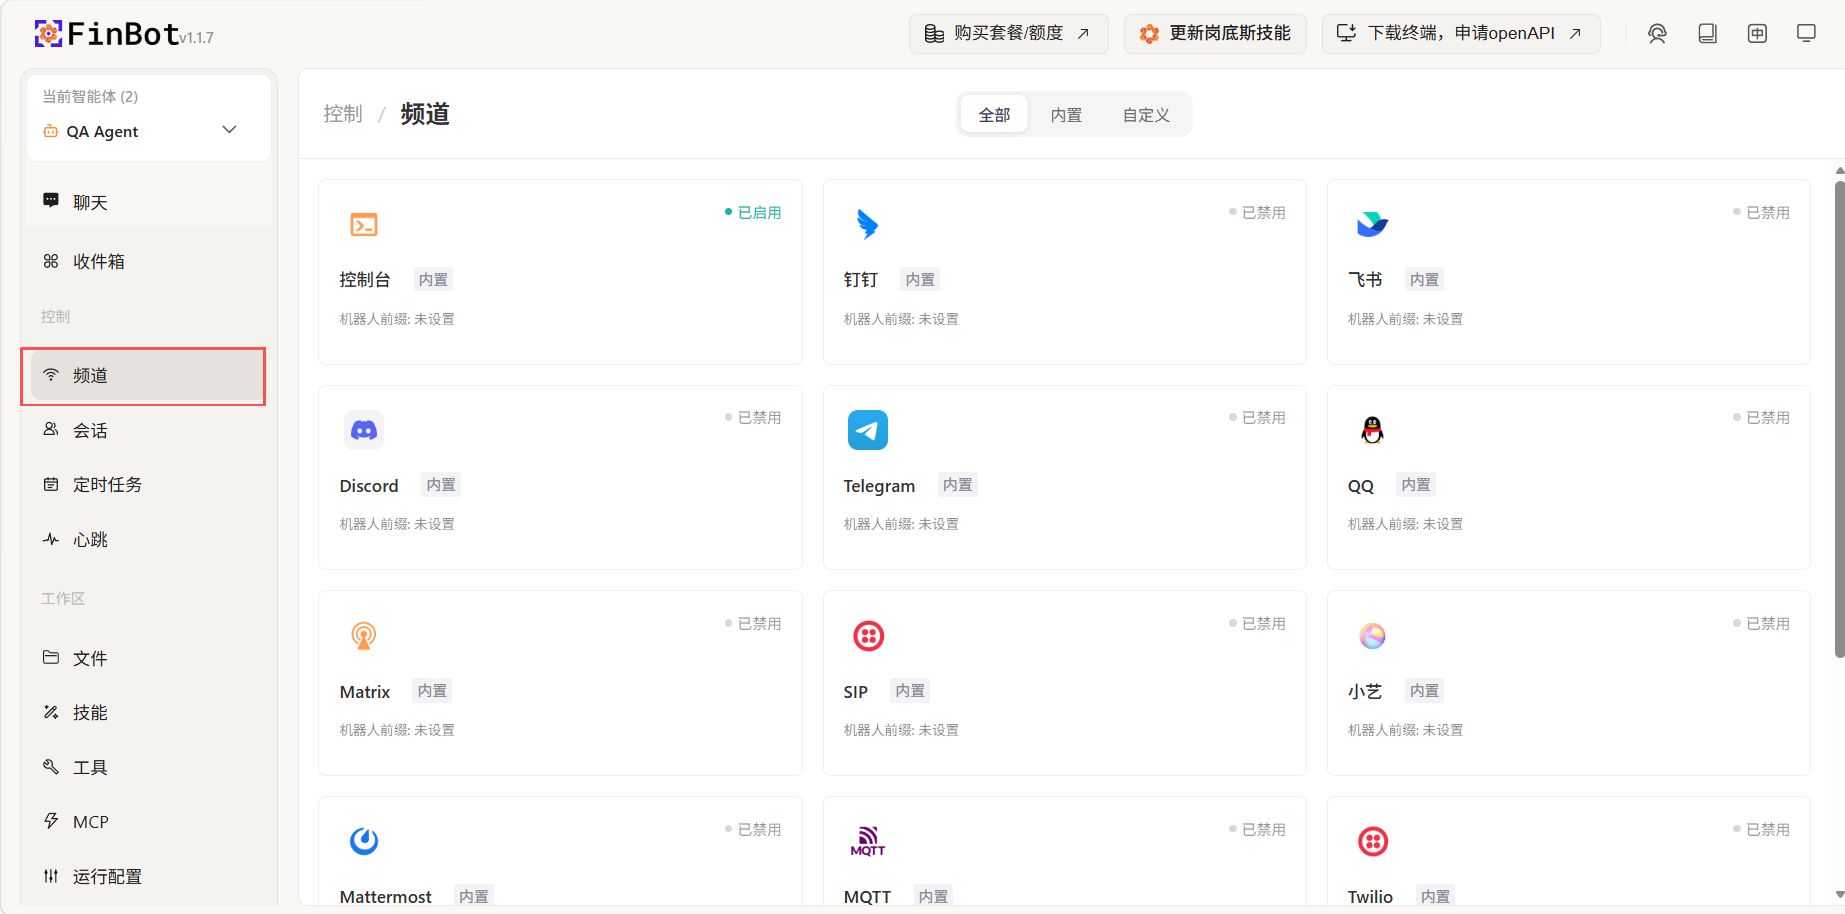
In FinBot, you can configure and manage different communication channels, allowing agents to converse with you on multiple platforms.
Supported Channel Types
FinBot supports various communication channels, including but not limited to:
- Console: Web-based chat (enabled by default)
- Feishu: Chat within Feishu application
- QQ: QQ chatbot
- WeChat: WeChat messaging bot
- DingTalk: Chat within DingTalk application
- Others: Discord, Telegram, Matrix, Mattermost, MQTT, SIP, Twilio, etc.
Channel Configuration Entry
In the FinBot interface left navigation bar, click the Channels icon to enter the channel configuration page.
Feishu
Enable Feishu Channel
On the channel configuration page, find the Feishu option and click the Enabled switch to turn it on.
Scan QR Code for Authorization
- Click the Get Feishu QR Code button
- Use the Feishu App to scan the displayed QR code
- After completing authorization, the system will automatically create a Feishu app and obtain App ID and App Secret, filling them into the corresponding fields
Save Configuration
After confirming that App ID and App Secret have been automatically filled in, click the Save button at the bottom of the page to complete the configuration.
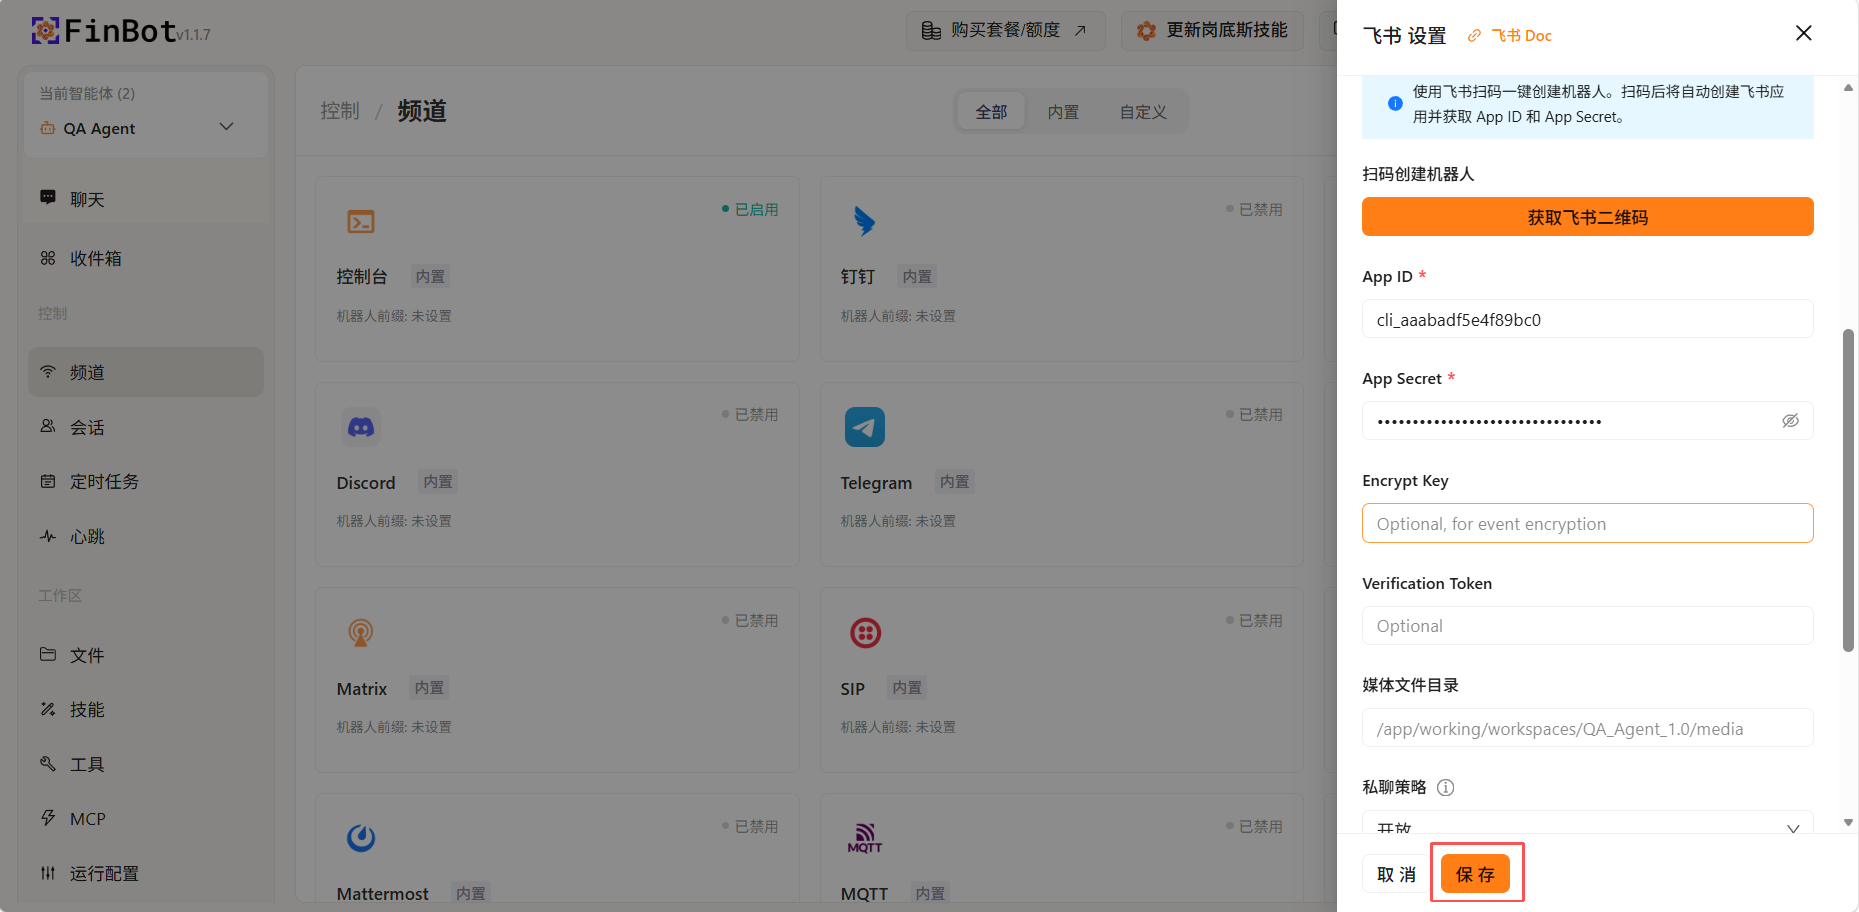
Tip: After QR code authorization, App ID and App Secret are automatically filled in—no manual input required. To configure encryption or verification, optionally fill in Encrypt Key and Verification Token.
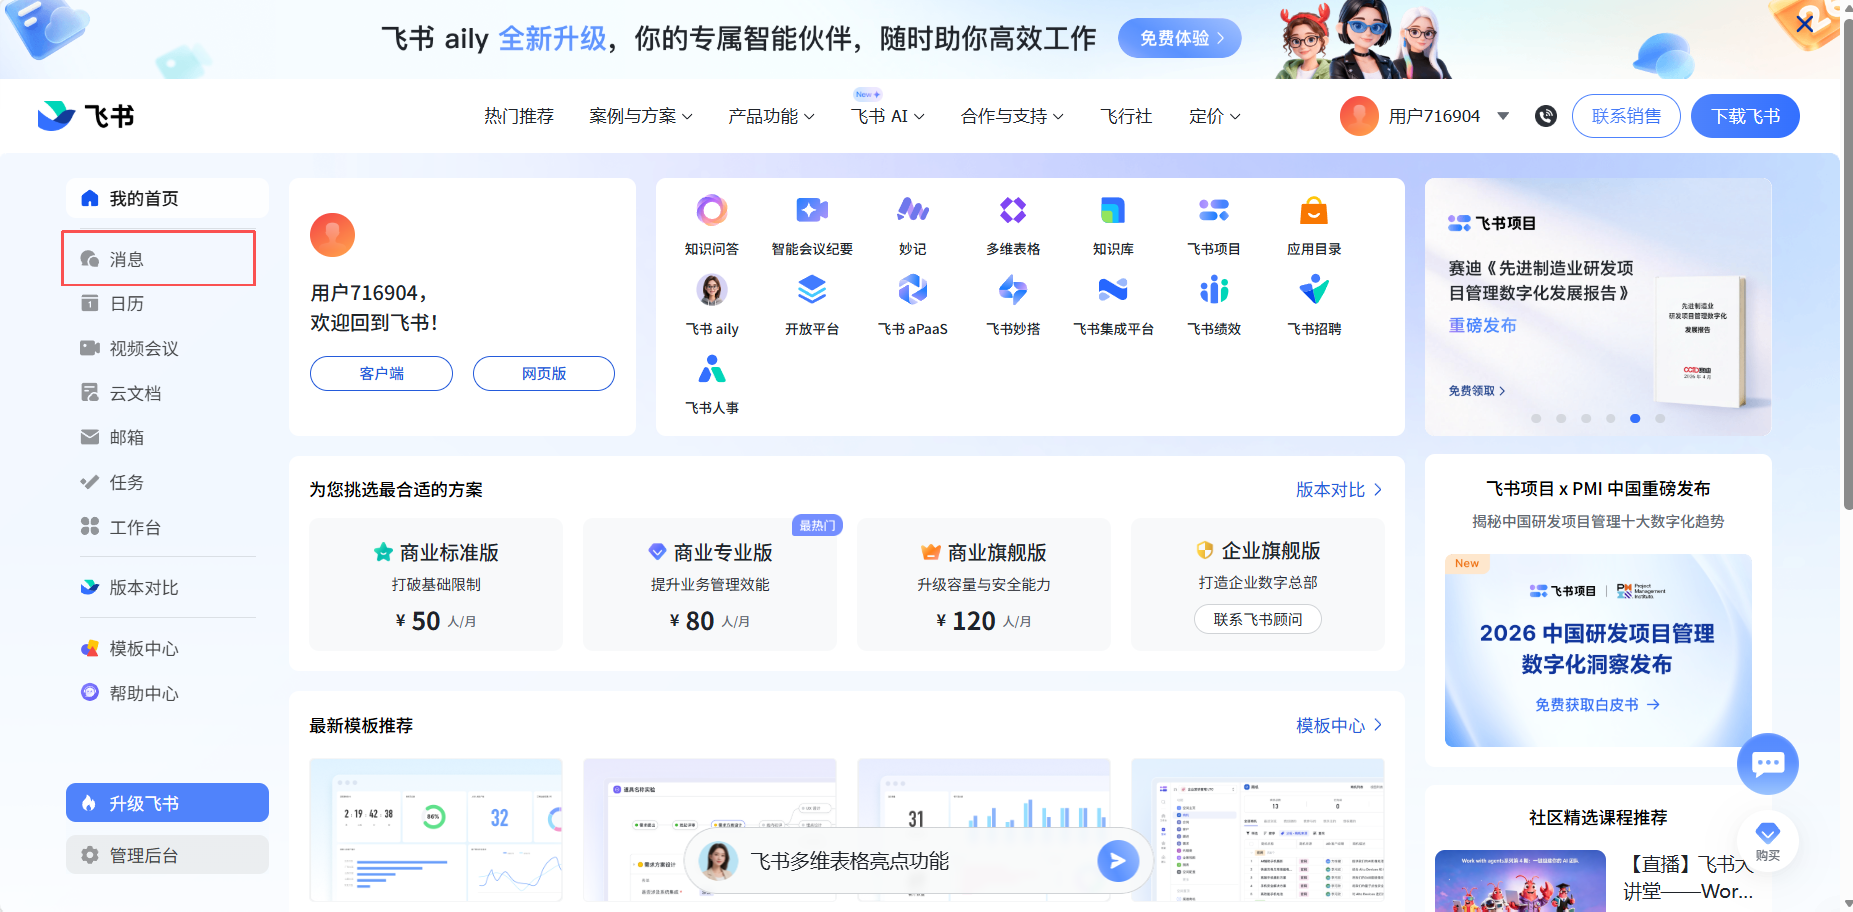
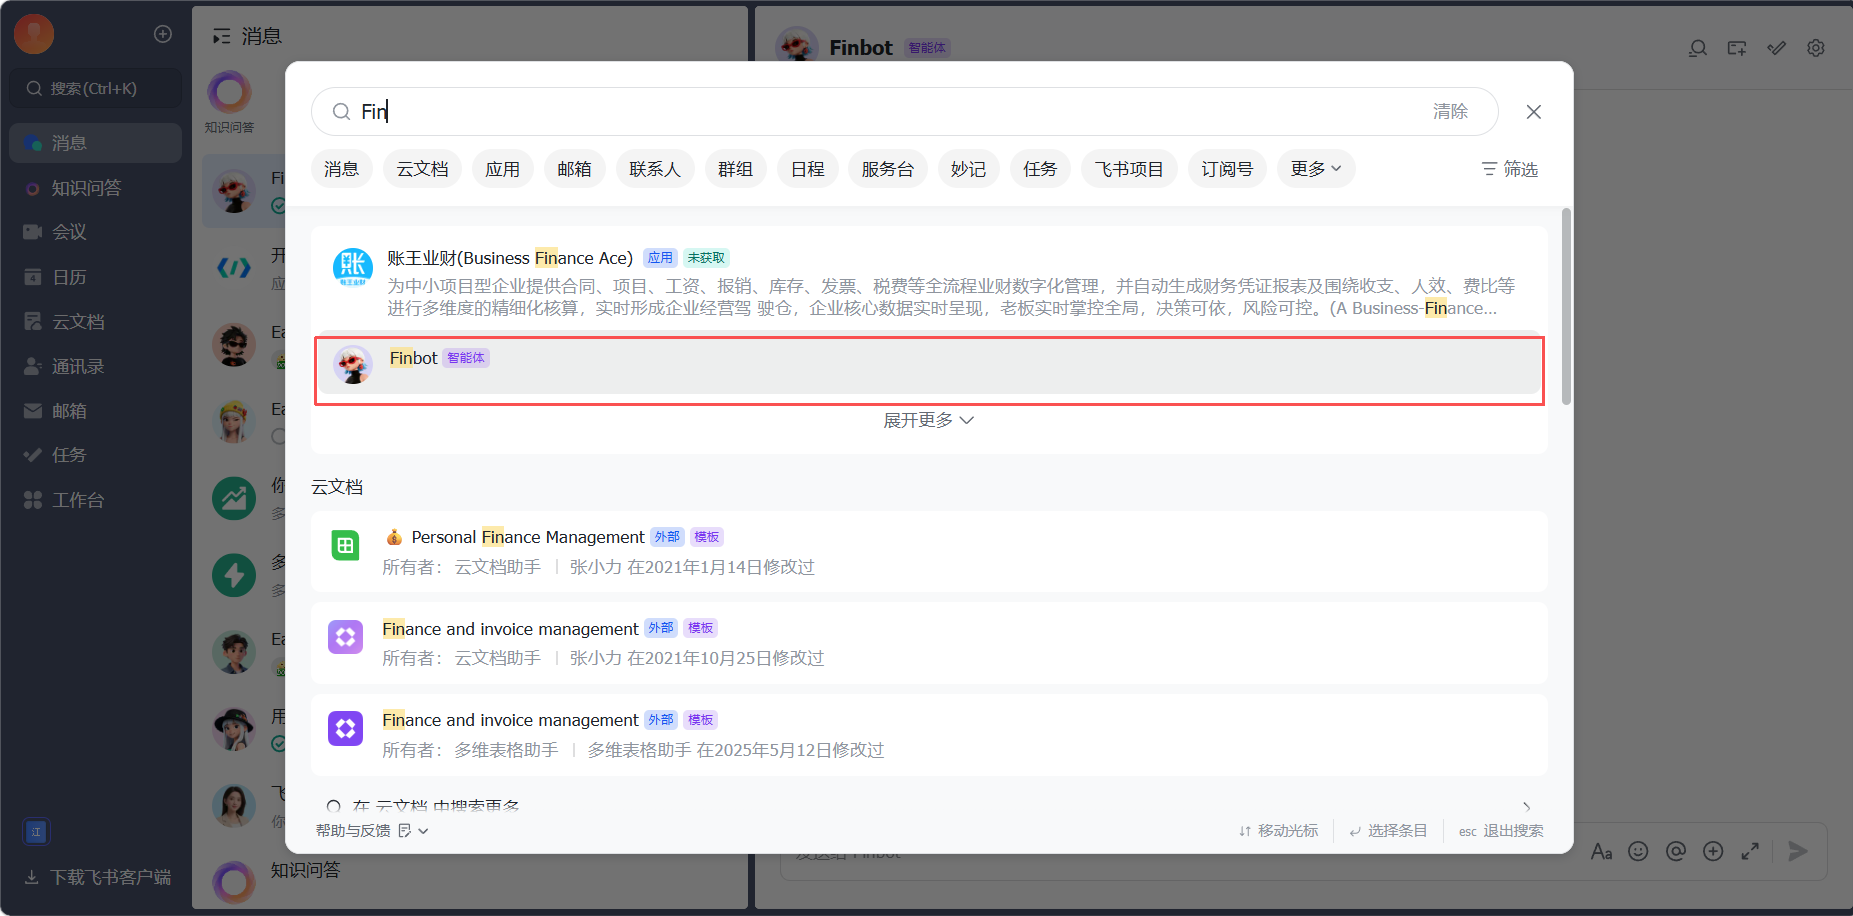
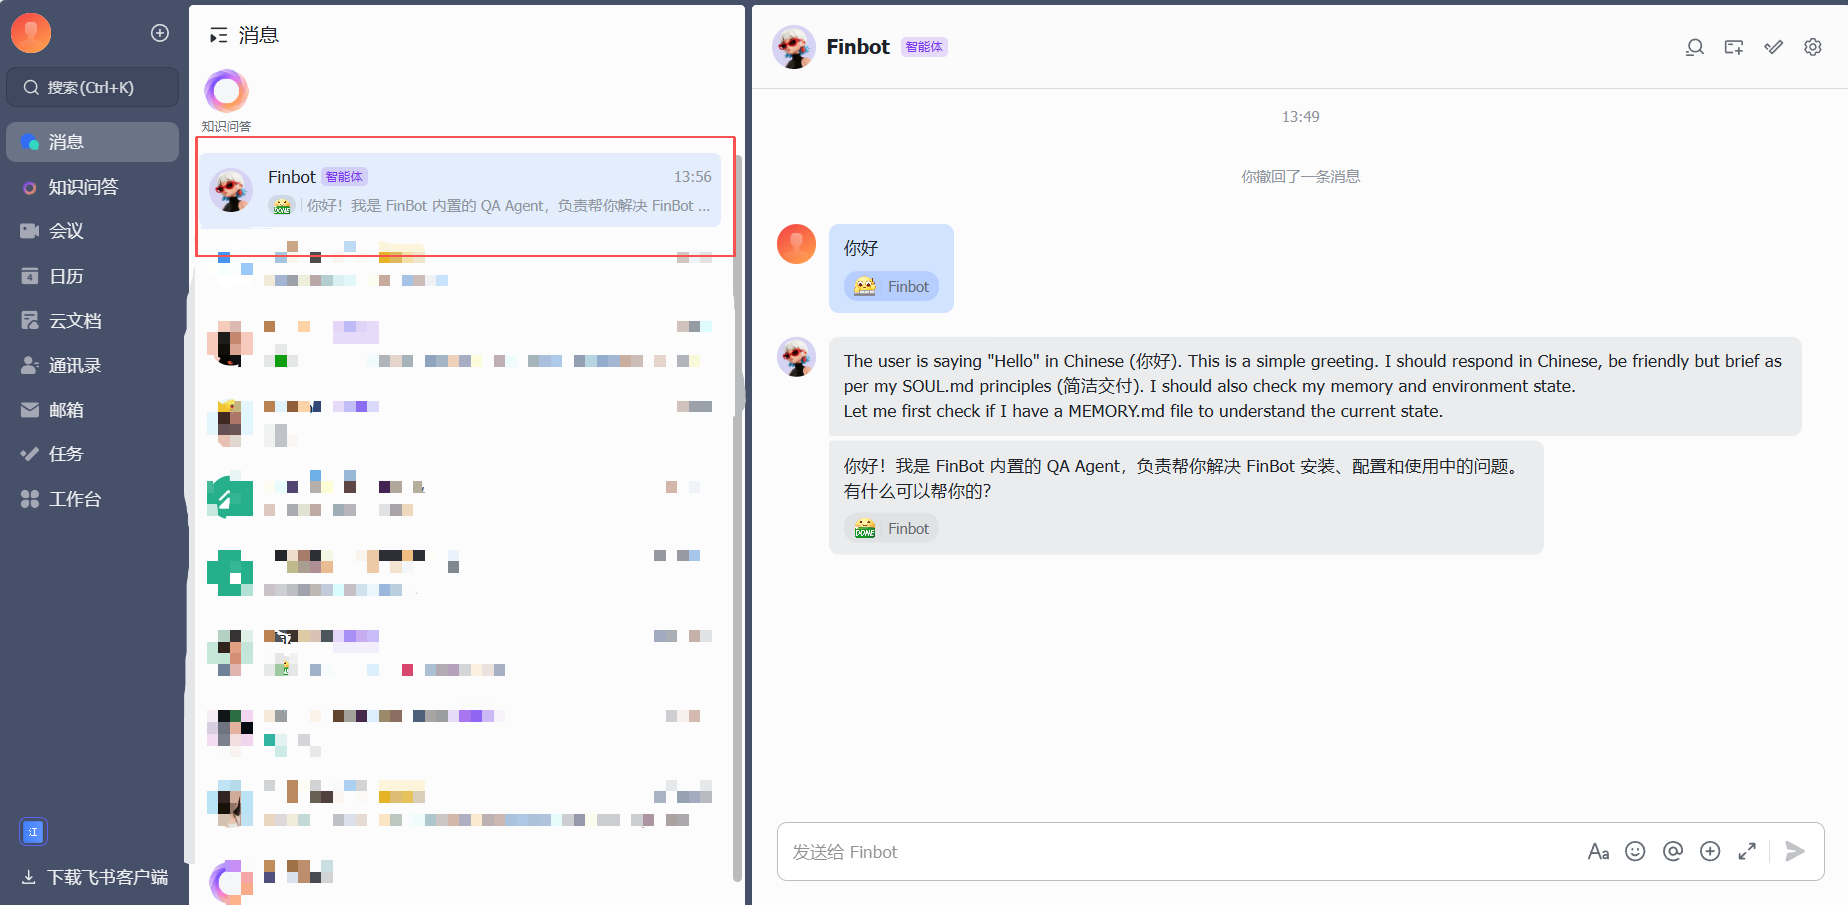
Use Agent in Feishu
- Open the Feishu app and go to the Messages page
- Enter the agent name in the search box
- Click the agent avatar to enter the chat interface
- Start conversing with the agent and enjoy the convenience of the AI assistant
Tip: If you cannot find the agent, check whether the Feishu channel has been successfully enabled and configuration saved.
QQ
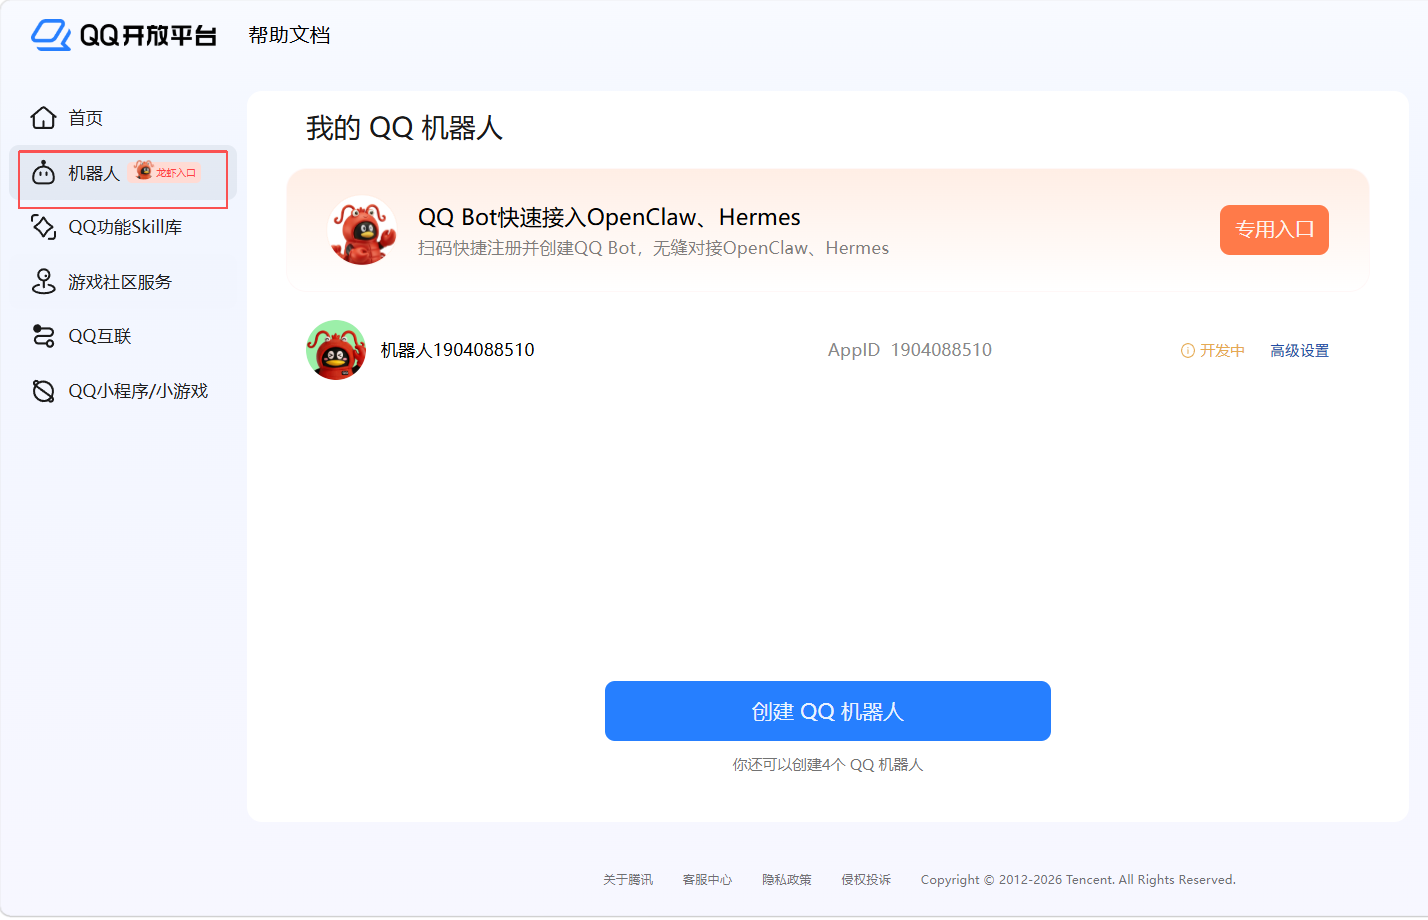
Create Bot on QQ Open Platform
- Visit QQ Open Platform
- Sign in with your QQ account
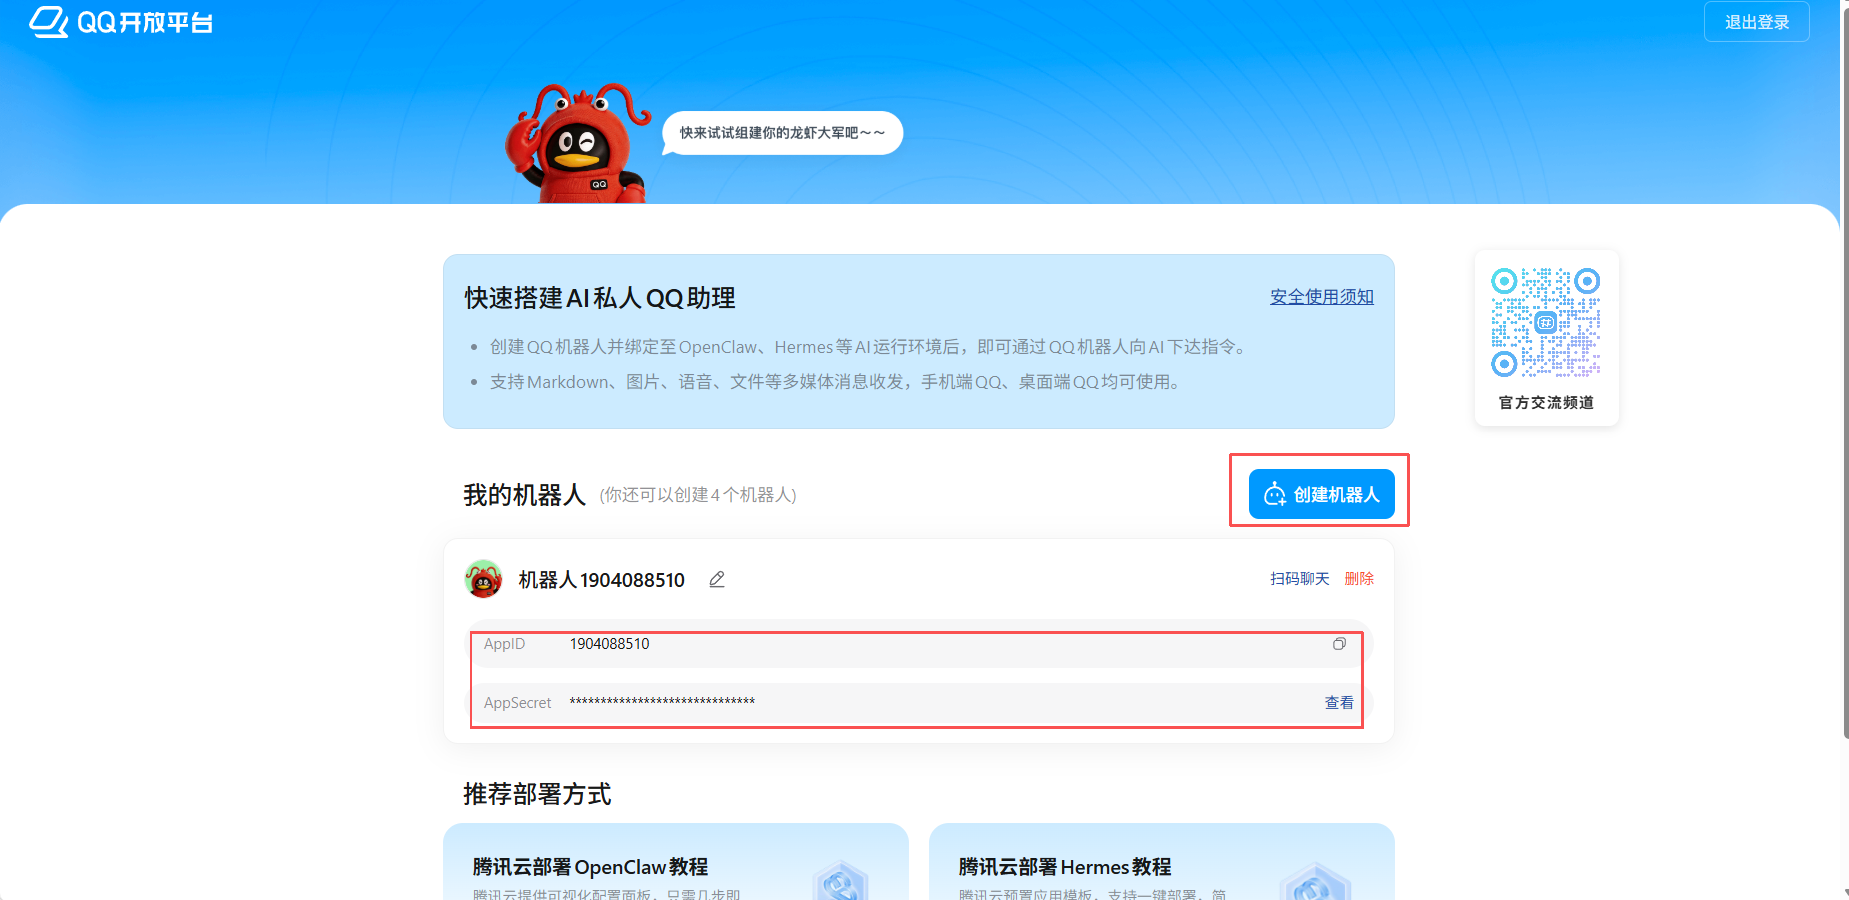
- Click the Create QQ Bot button
- Complete bot creation following the prompts
Obtain AppID and AppSecret
- On the My Bots page, find the created bot
- Copy the AppID and AppSecret information
- Keep AppSecret safe. For security reasons, viewing it again will force a reset
Configure QQ Channel in FinBot
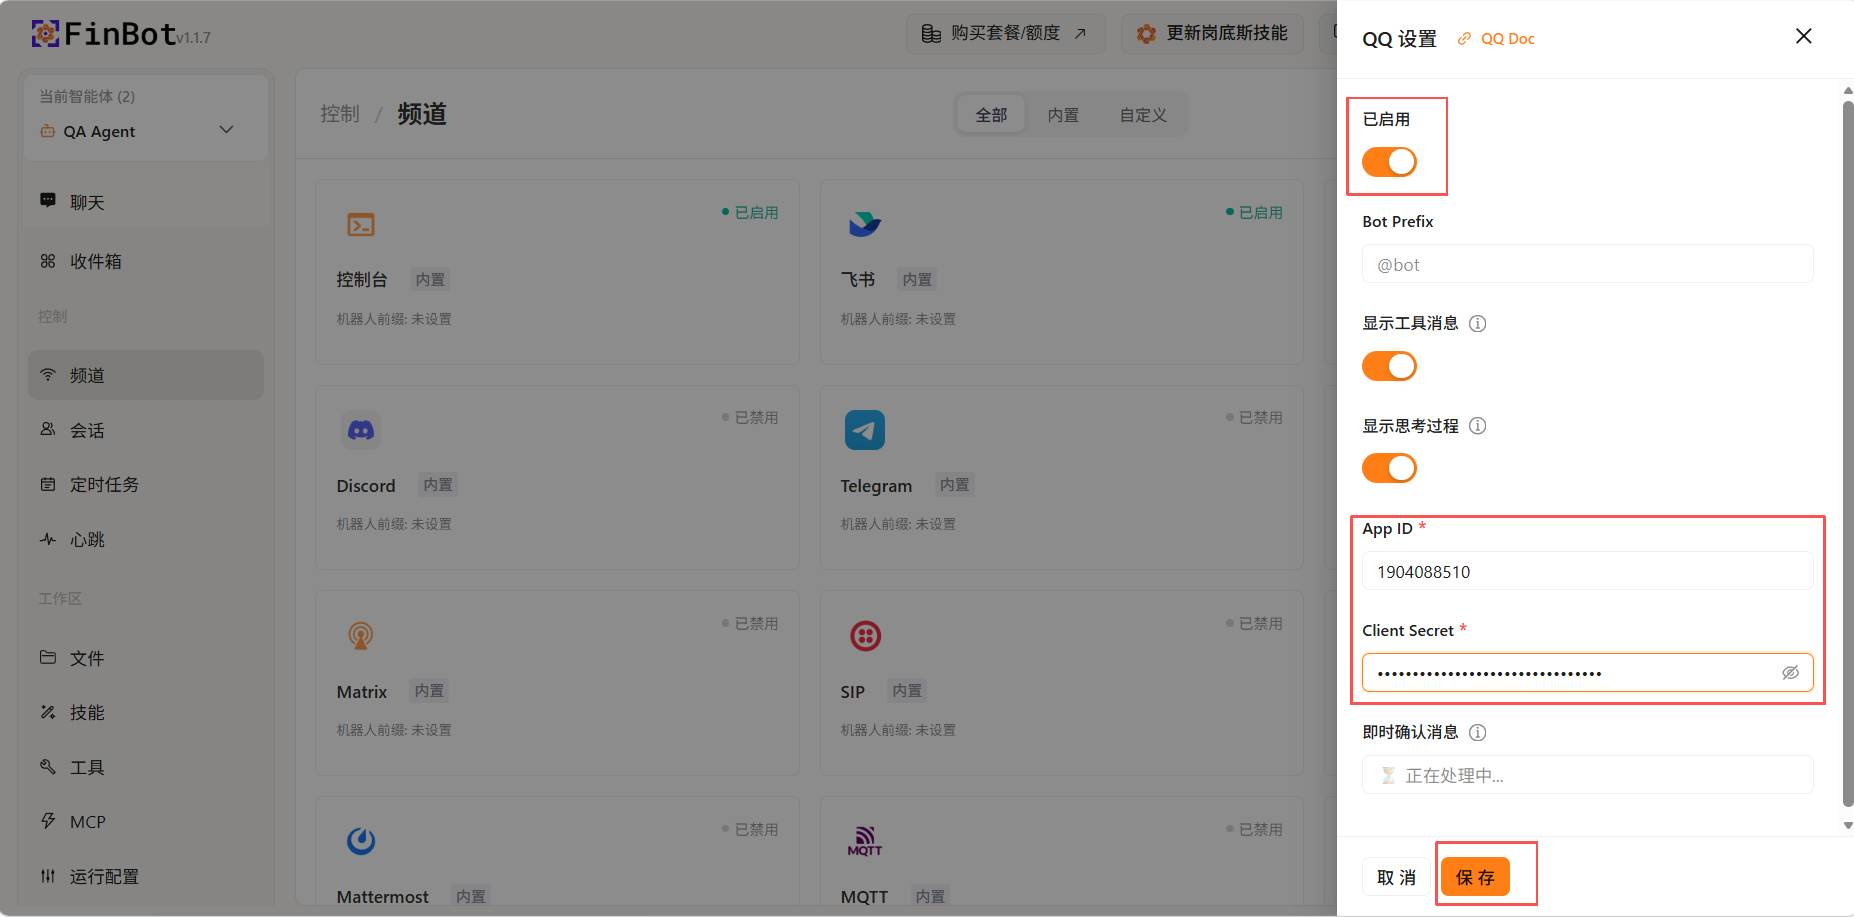
- On the FinBot channel configuration page, find the QQ option and click the Enabled switch to turn it on
- Paste the copied AppID into the App ID field
- Paste the copied AppSecret into the Client Secret field
- Click the Save button to complete configuration
Tip: AppSecret is displayed only once. Keep it safe. If lost, you need to recreate the bot to obtain new credentials.
Use Agent in QQ
After completing QQ bot creation and channel configuration, you can start conversing directly.
Tip: If you do not receive bot messages, open QQ and find the bot in the chat list to enter the conversation interface.
WeChat
Enable WeChat Channel
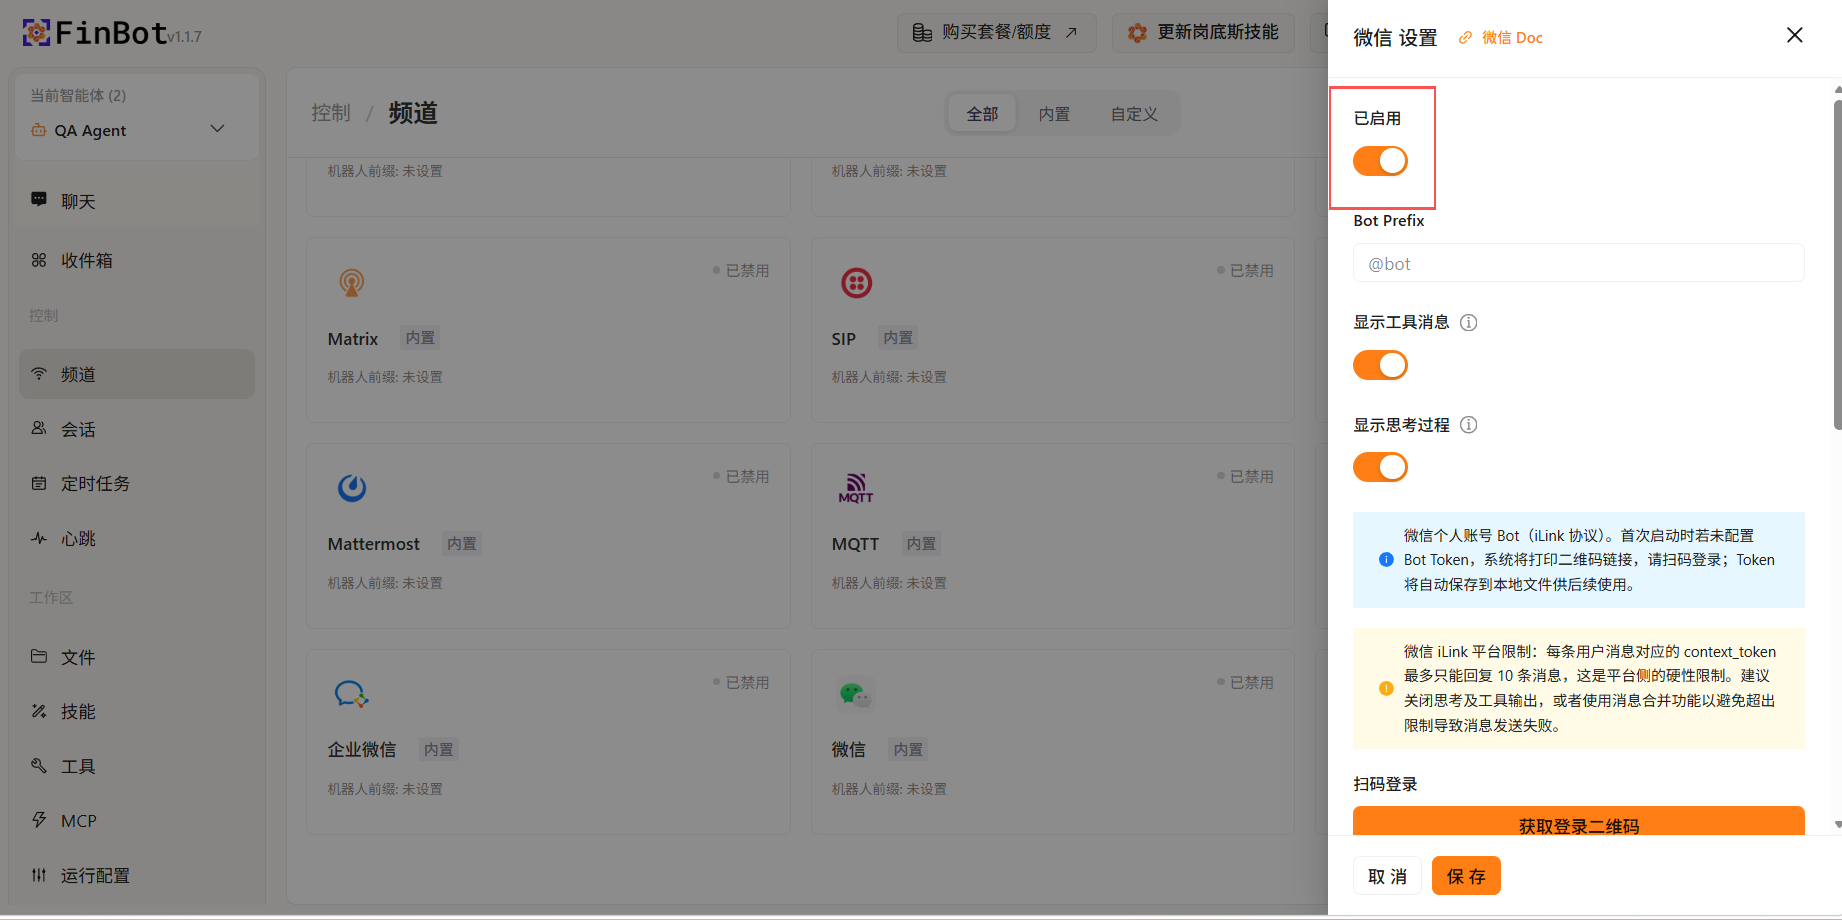
On the channel configuration page, find the WeChat option and click the Enabled switch to turn it on.
Scan QR Code for Authorization
- Click the Get Login QR Code button
- Use WeChat to scan the displayed QR code
- After completing authorization in WeChat, you are automatically redirected to the agent chat interface—no manual search required
- The system automatically obtains WeChat app credential information and fills it into the corresponding fields
Save Configuration
After confirming credential information has been automatically filled in, click the Save button at the bottom of the page to complete the configuration.
Tip: After QR code authorization, related credentials are automatically filled in—no manual input required.
Use Agent in WeChat
After QR code authorization completes, the system automatically redirects to the agent chat interface. You can start conversing directly.
Tip: If not automatically redirected, open WeChat and find the agent in the chat list to enter the conversation interface.
DingTalk
Enable DingTalk Channel
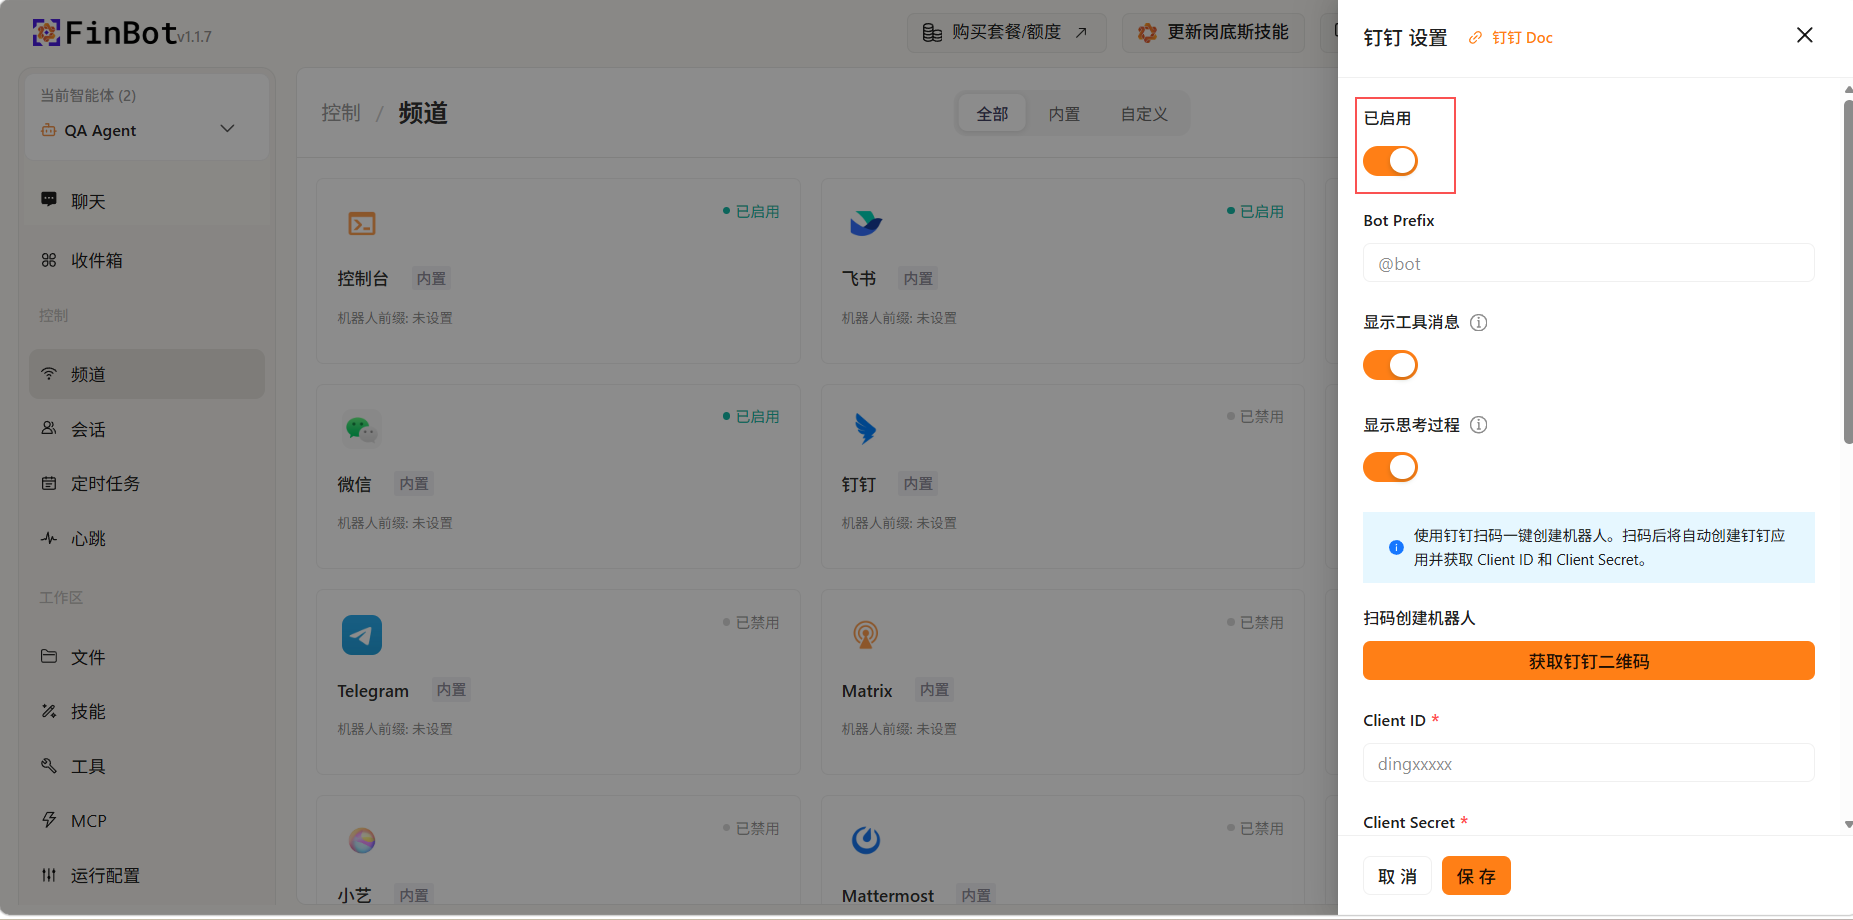
On the channel configuration page, find the DingTalk option and click the Enabled switch to turn it on.
Scan QR Code for Authorization
- Click the Get DingTalk QR Code button
- Use the DingTalk App to scan the displayed QR code
- After completing authorization in DingTalk, the system automatically obtains DingTalk app credential information and fills it into the corresponding fields
Save Configuration
After confirming credential information has been automatically filled in, click the Save button at the bottom of the page to complete the configuration.
Tip: After QR code authorization, related credentials are automatically filled in—no manual input required.
Use Agent in DingTalk
After authorization completes, you can find the agent in DingTalk and start conversing.
Tip: If you cannot find the agent, check whether the DingTalk channel has been successfully enabled and configuration saved.
Channel Notes
- Each channel must be configured and enabled separately
- Ensure third-party platform account permissions are correctly set
- Regularly check channel connection status to ensure messages are sent and received normally
- Different channels may have different message format limitations
Scheduled Tasks
Supports creating and managing automated scheduled tasks for periodic and fixed-time automatic execution. Provides two creation methods: quick create via conversation and manual create.
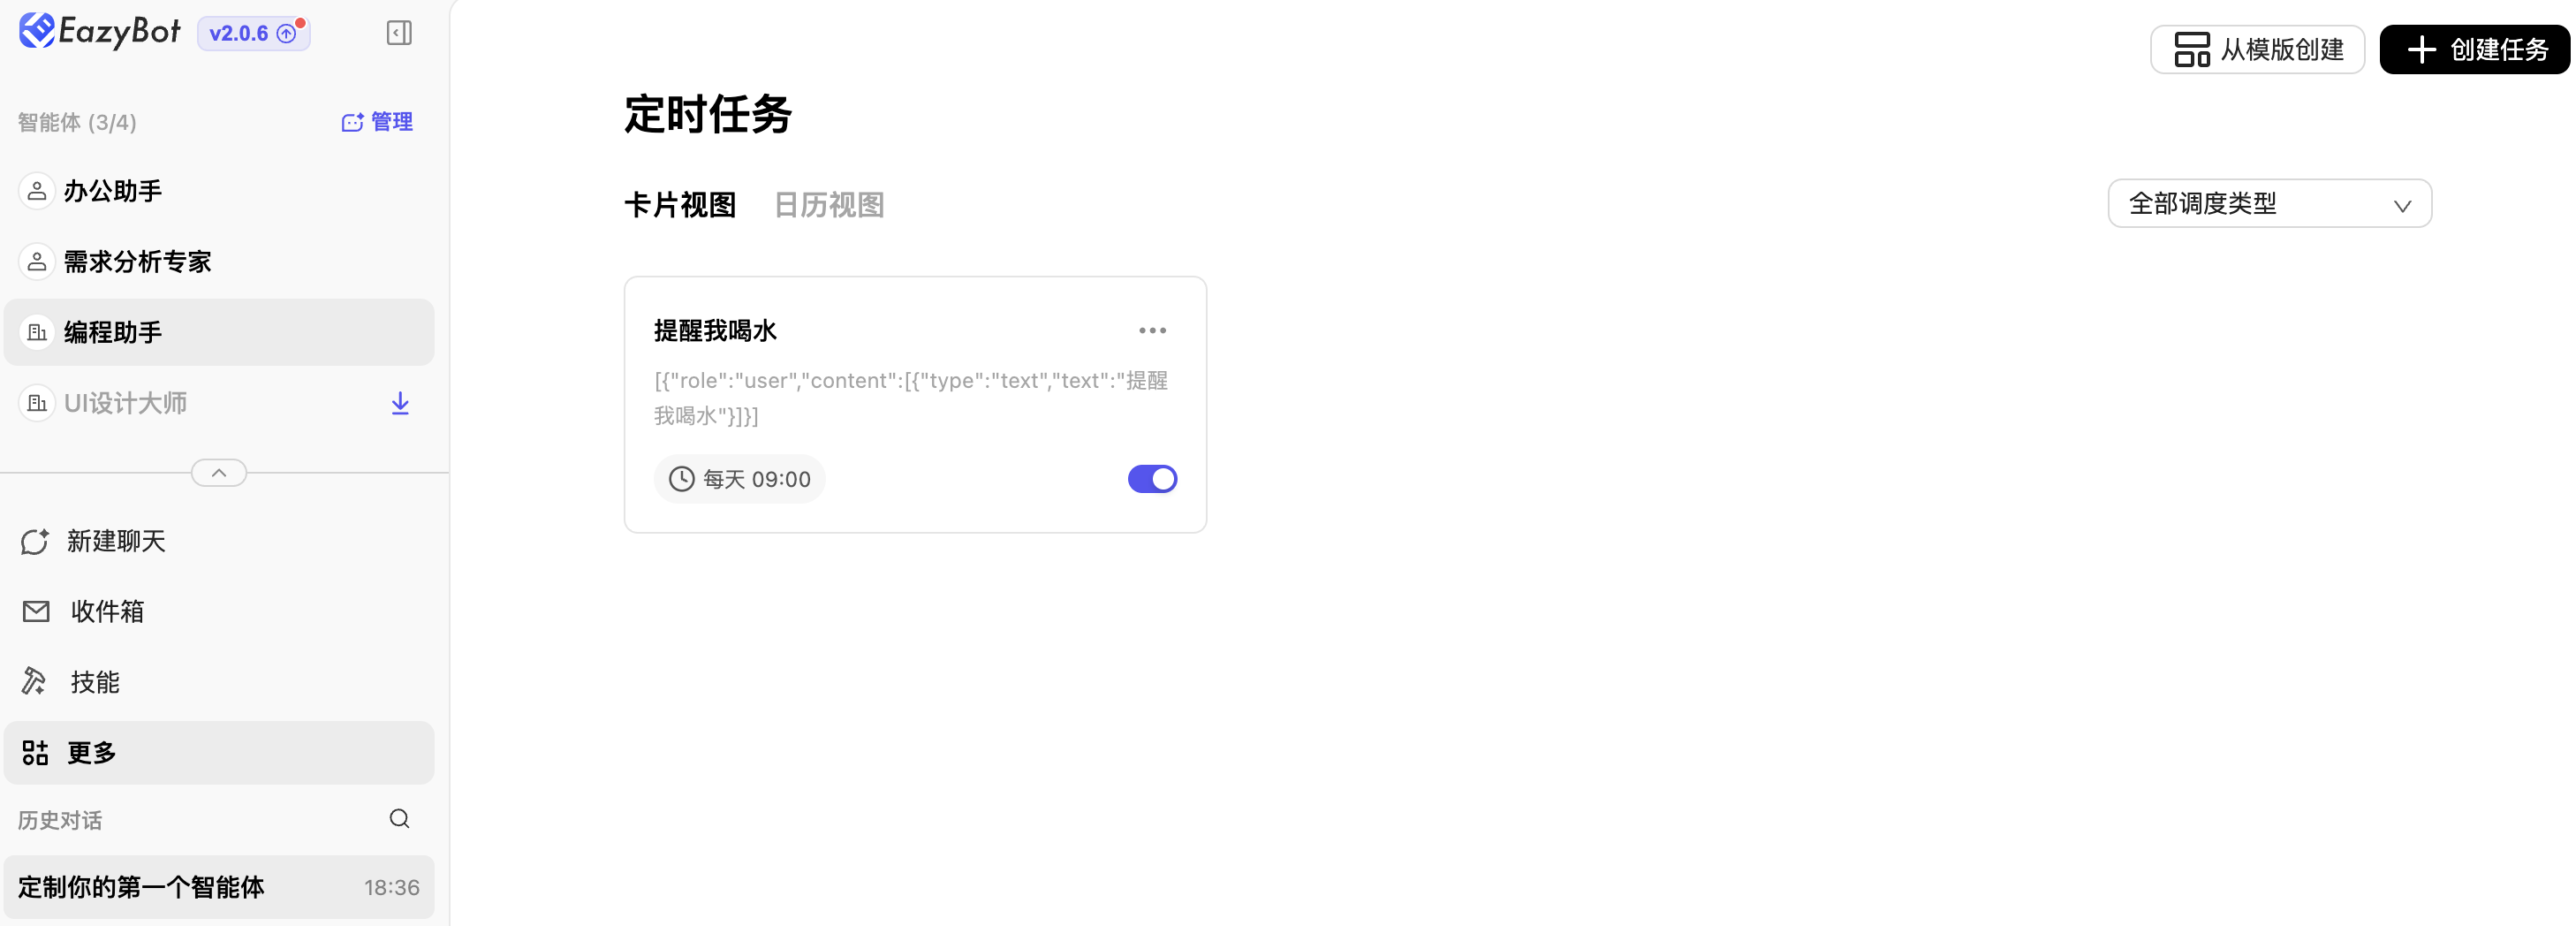
Quick Create (Recommended)
Talk directly to EazyBot / FinBot to quickly generate scheduled tasks without manual configuration. Example: Help me create a scheduled task to remind me to drink water every 5 minutes. After task creation, view and manage it in the scheduled task list in this console.
Manual Create
Click the Create Task button and fill in configuration by form sections. Save when complete.
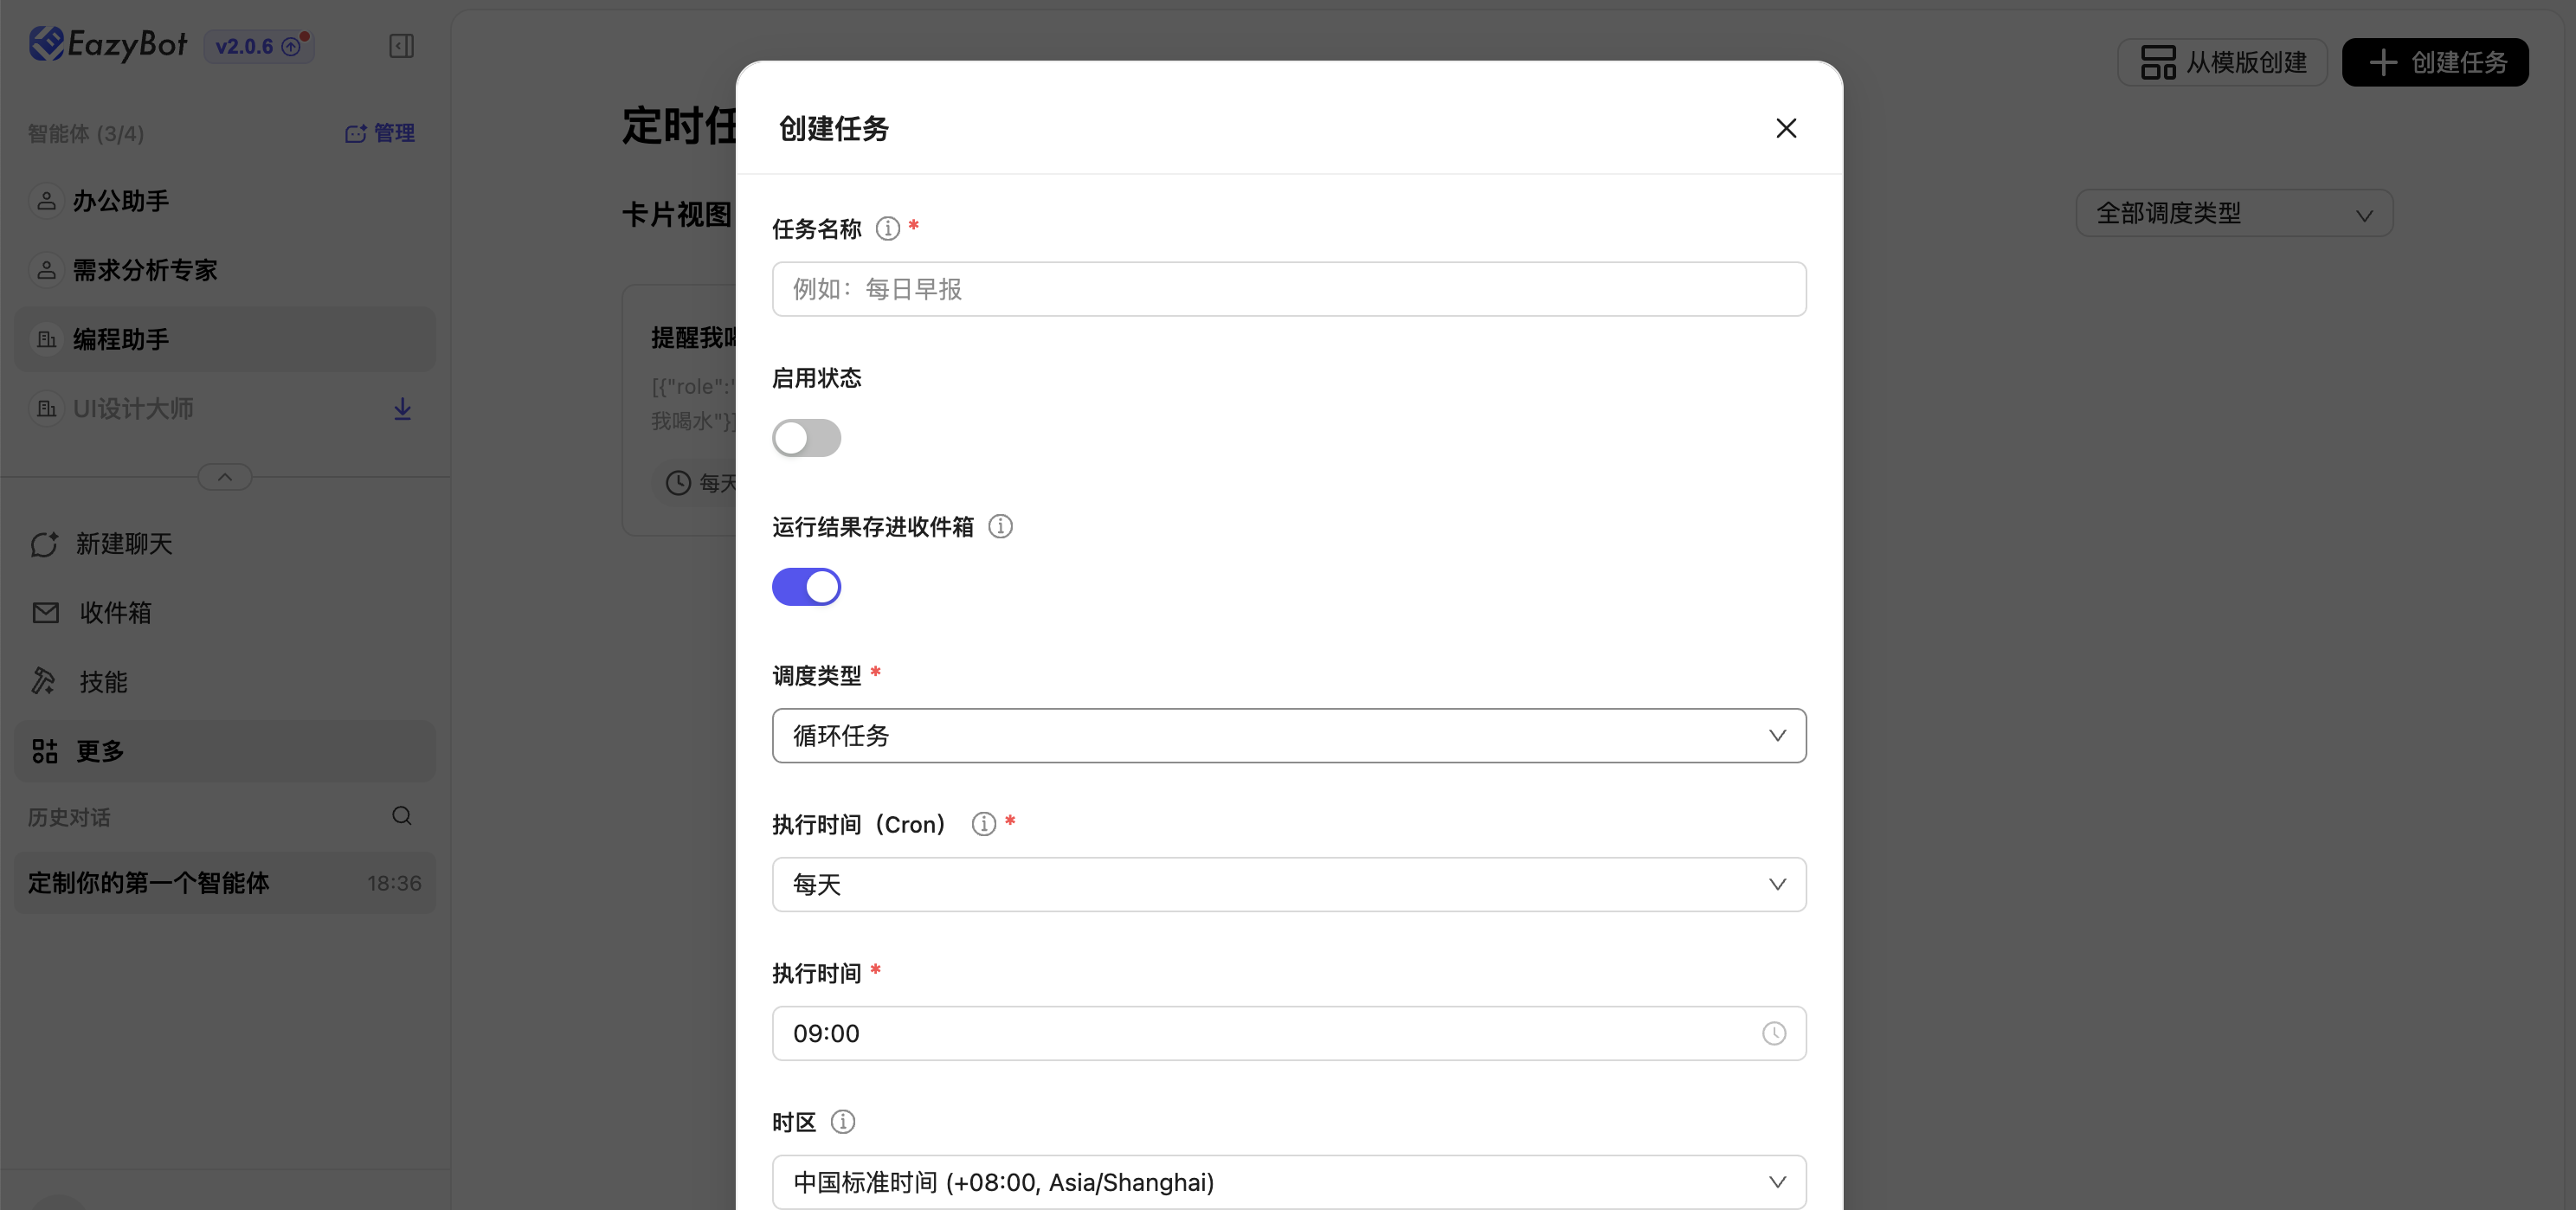
Common Task Operations
- Enable / Disable: Click the toggle in the task row to switch status directly.
- Edit task: Disable the task first, click edit to modify configuration. Takes effect after save.
- Run now: Trigger the task immediately once without waiting for the scheduled cycle.
- Delete task: Disable the task first, click delete and confirm to remove the task.
Models
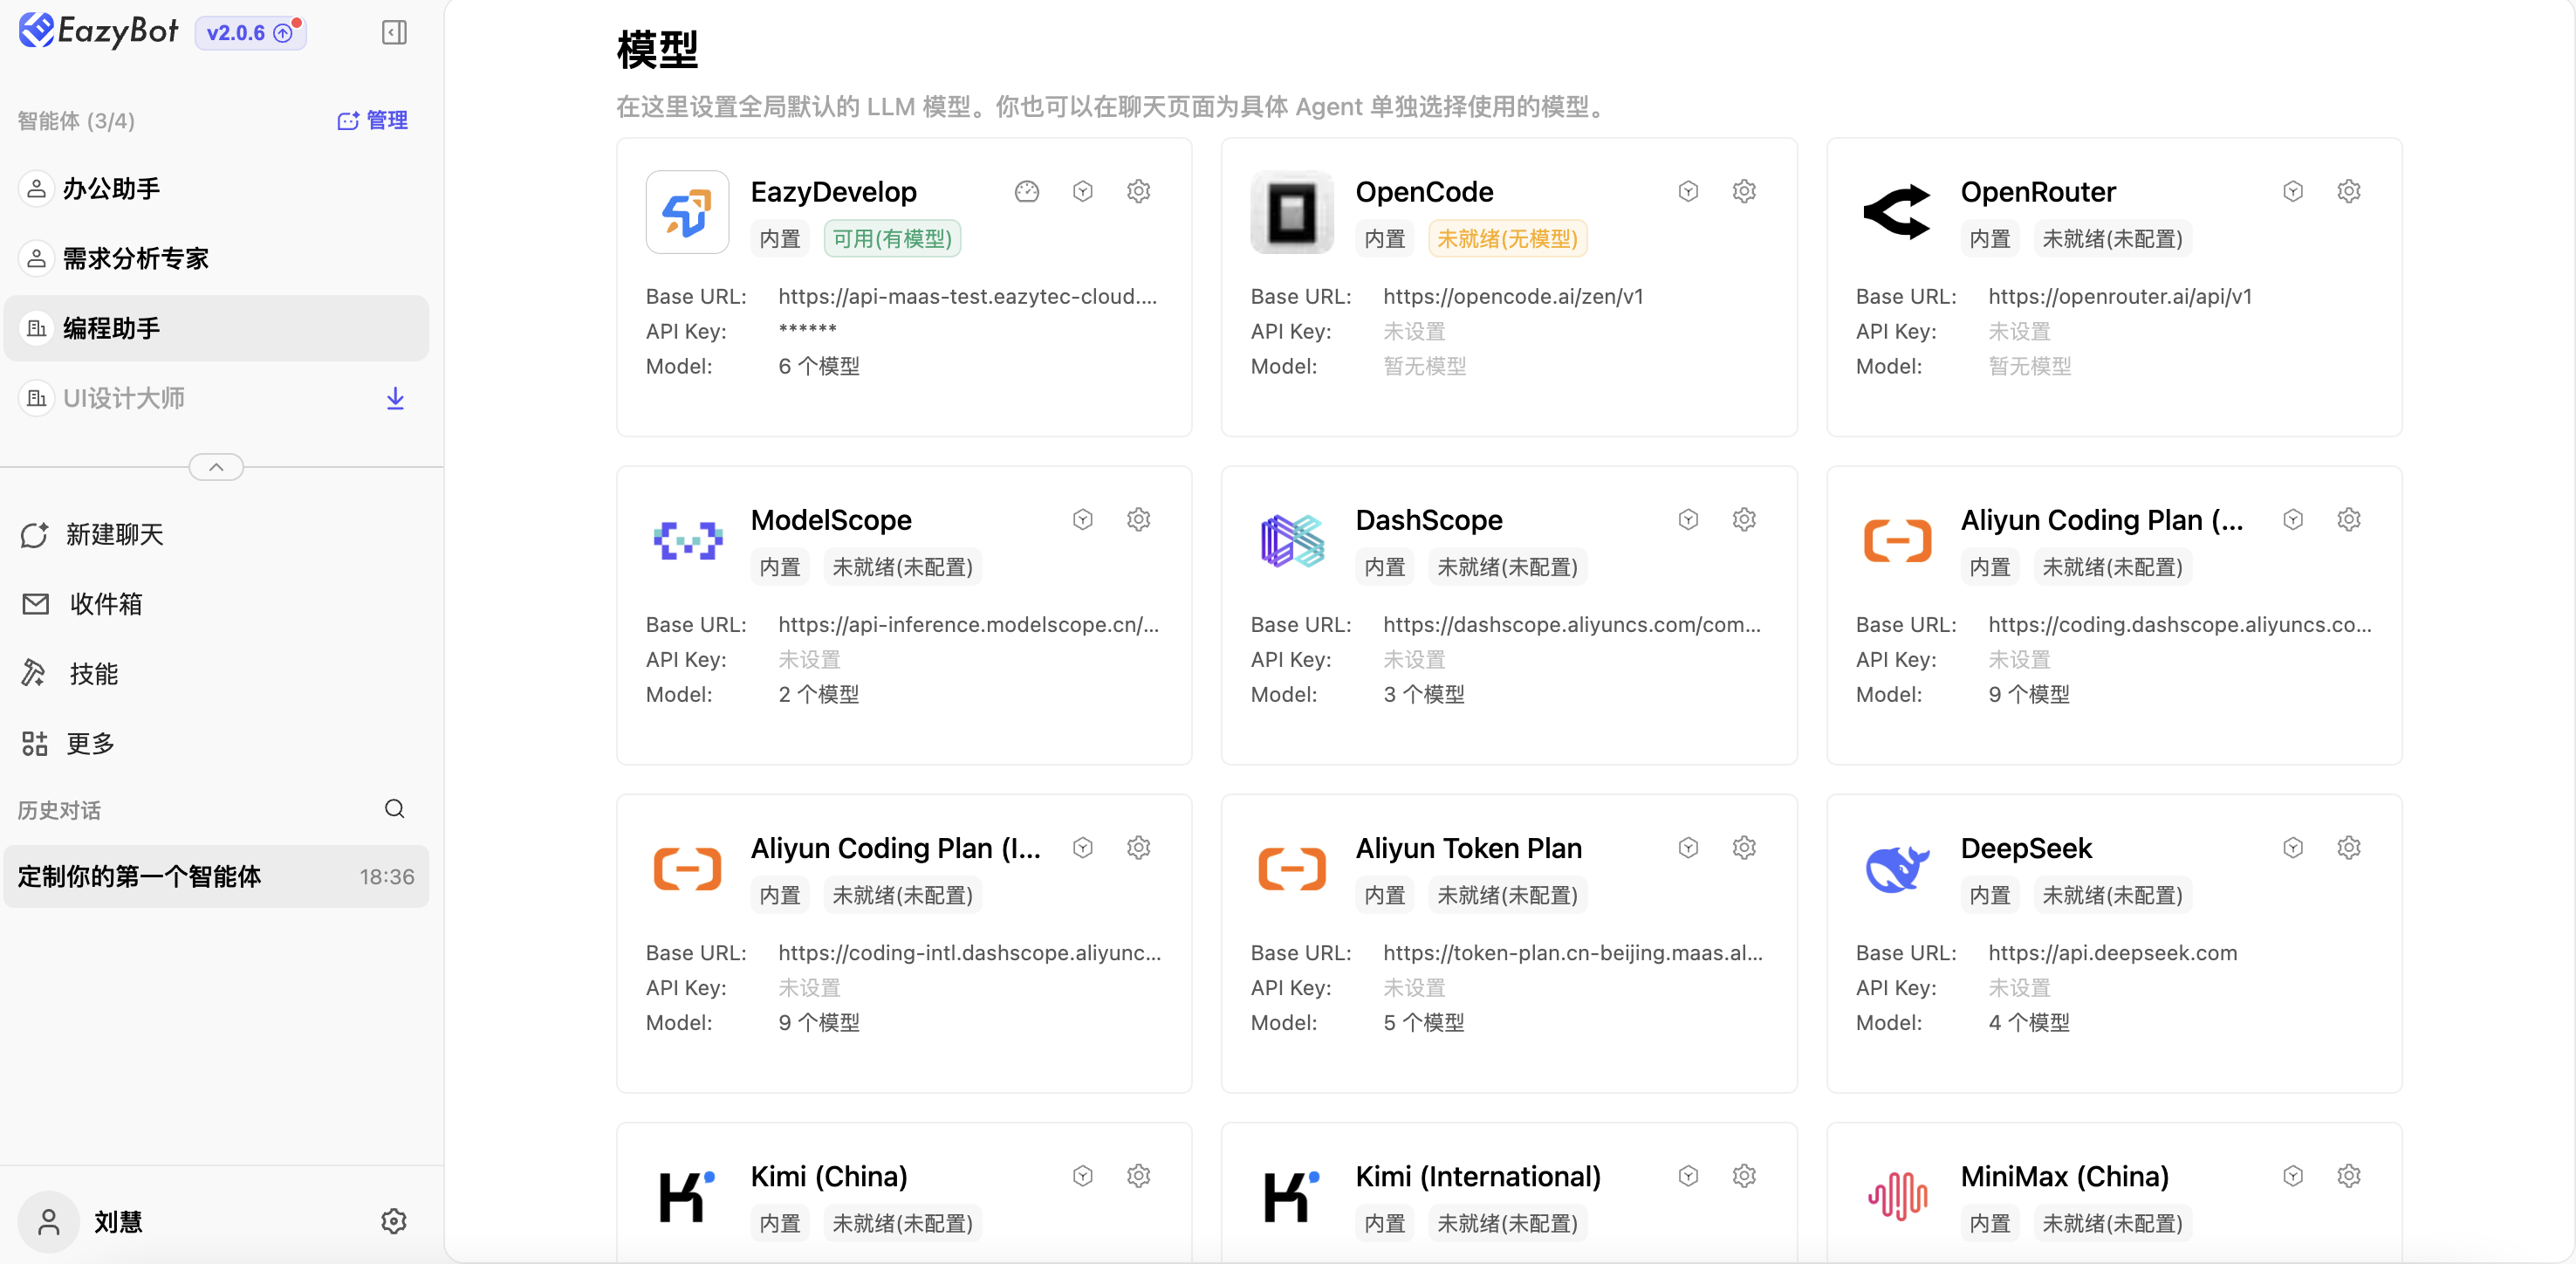
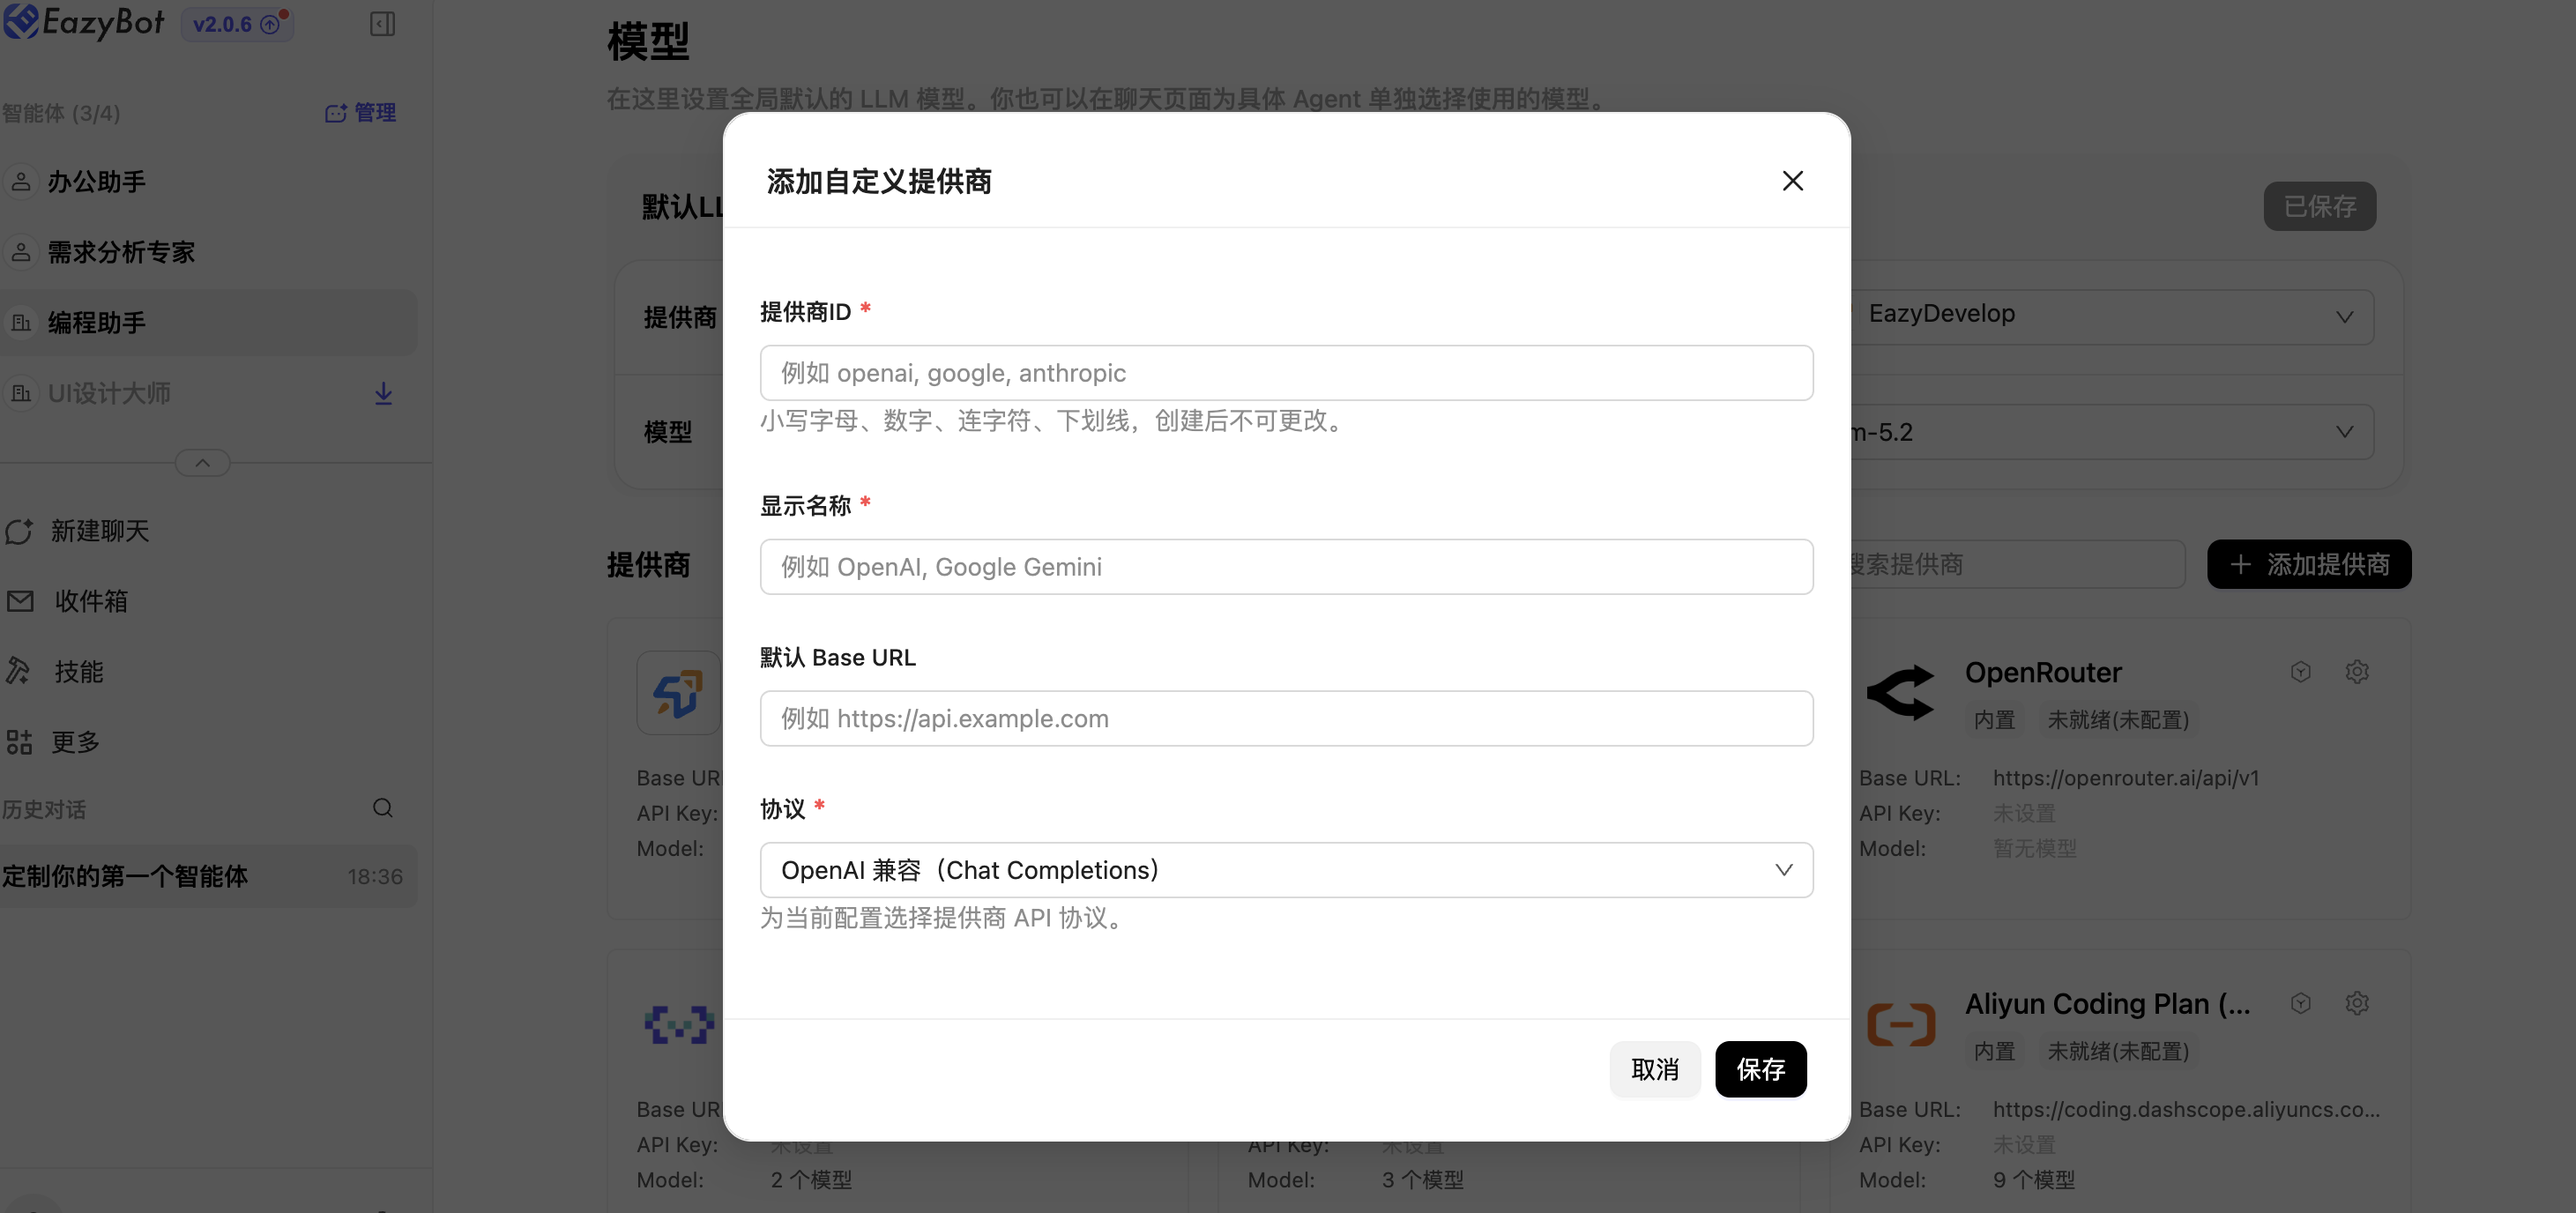
The platform's EazyDevelop provider is built in by default, integrating multiple popular models. Model keys are pre-configured for out-of-the-box use. Multiple model providers are supported. Configure and manage on the Settings → Models page in the left sidebar.
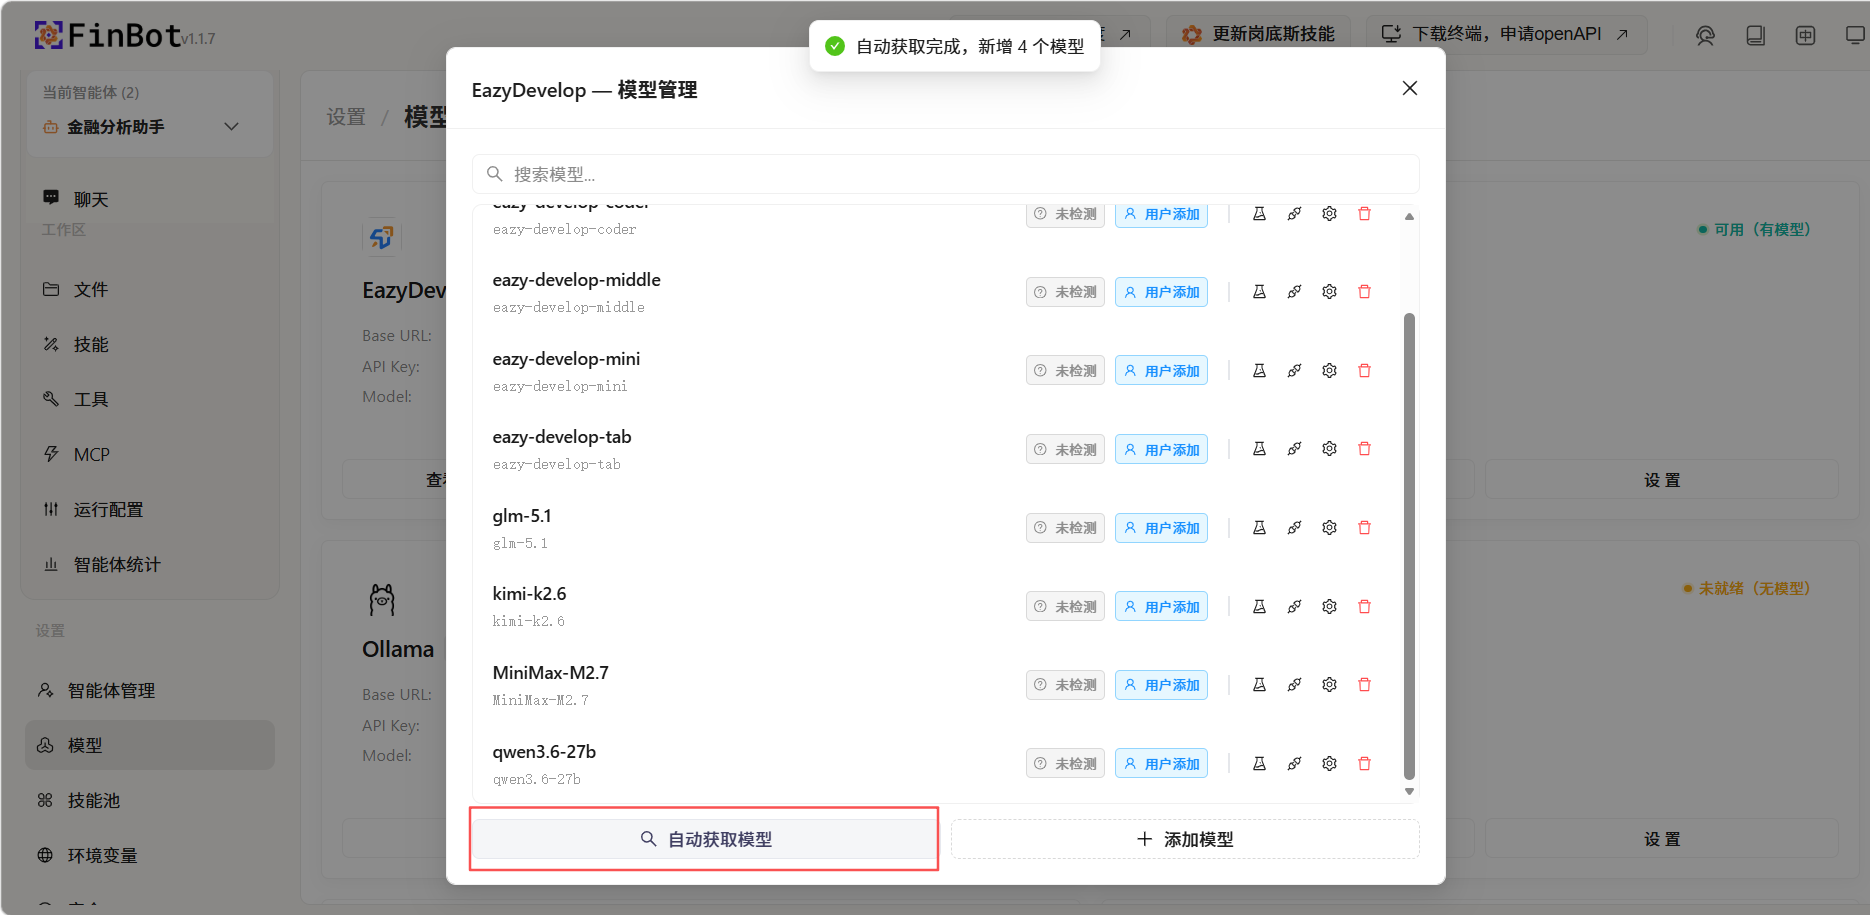
Auto-Fetch Models
Click auto-fetch models to automatically retrieve models enabled in EazyDevelop.
To connect other providers, find the corresponding provider to add models, or add providers manually.
File Management
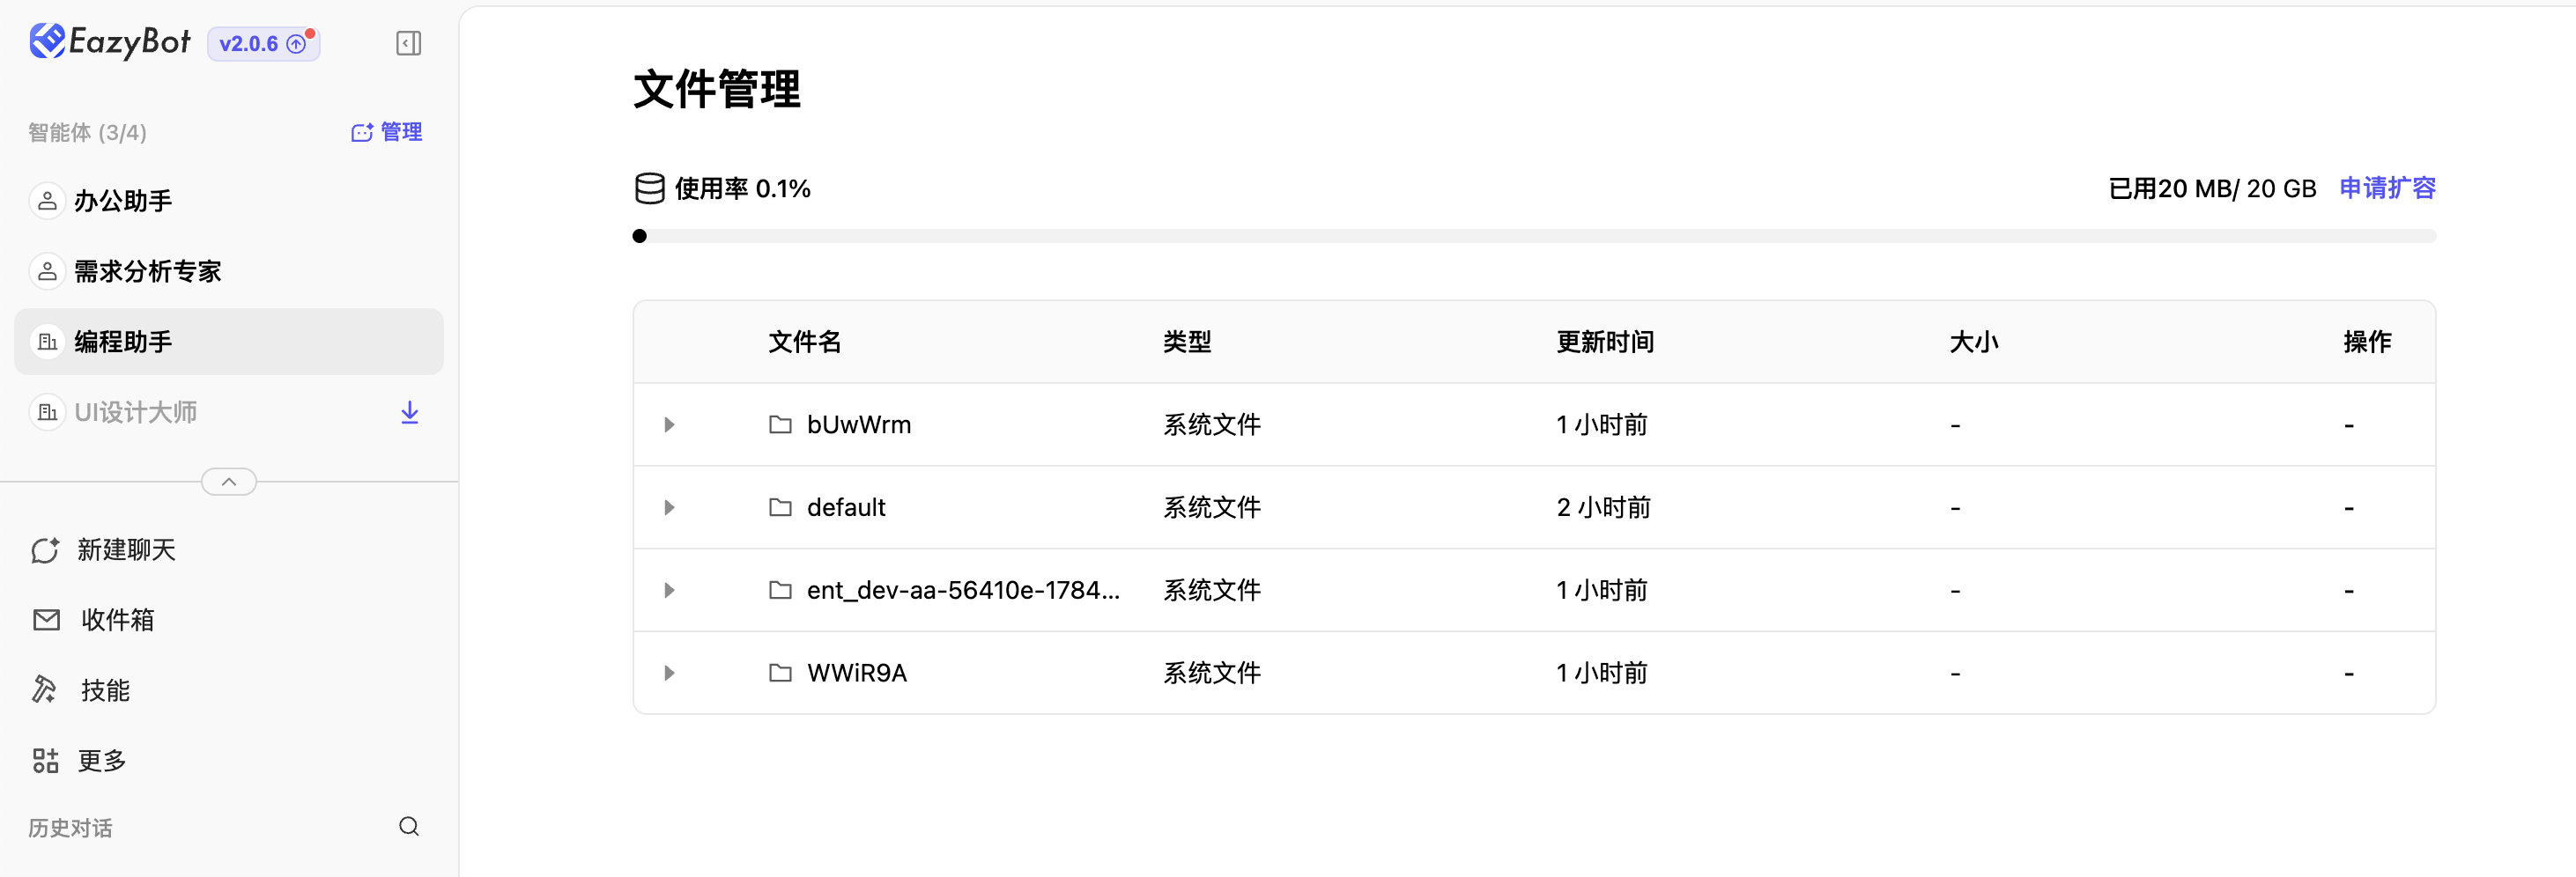
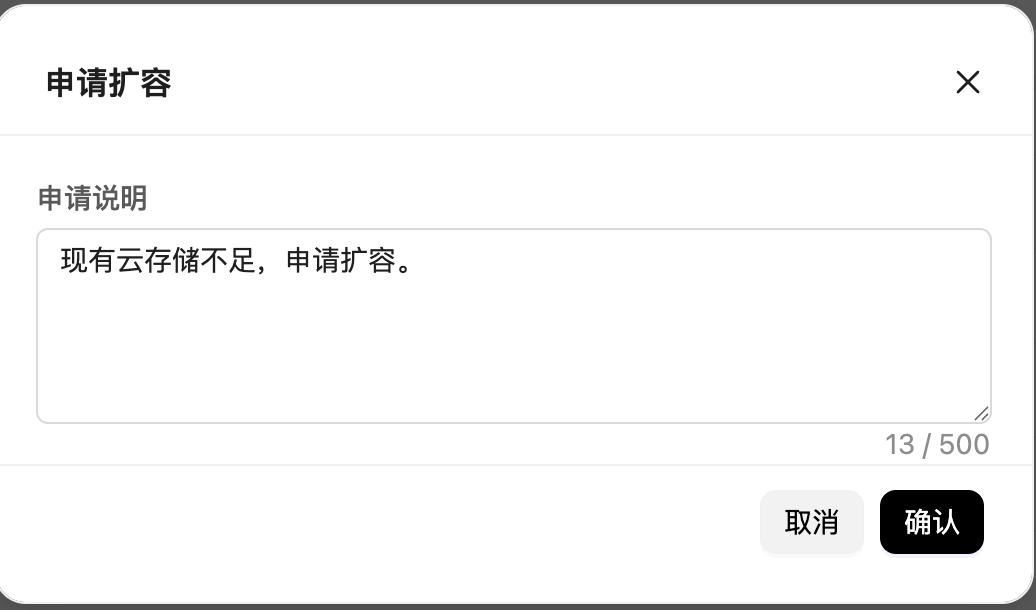
Supports unified viewing of files associated with all agents. Clean up unused files and query file storage usage in real time. If storage space is insufficient, submit an expansion request to the team administrator.
Notes
- Before installing or updating agents, ensure network connection is normal.
- After modifying models, environment variables, or security configuration, some Bots may require restart or refresh to take effect.
- Do not arbitrarily enter or leak sensitive keys in environment variables.
- After signing out, local account state is cleared. Sign in again when reusing.
- If the Bot cannot run normally, go to the debug page to view logs or contact customer support.